
This guide applies to all WiFi Cisco controllers. The configuration procedure has been performed and tested for version 8.8.100.0 and shows only a basic configuration. A Cisco AIR-AP-1832I-E-K9 has been used to provide connection to clients.
To correctly integrate a Cisco controller with HSNM, the installer must have good networking skills, and the controller must:
For any further details about Cisco vWLC configuration, you can refer to Cisco documentation at https://www.cisco.com/c/en/us/td/docs/wireless/controller/8-0/configuration-guide/b_cg80.html
Click the Security tab at the top, then click the RADIUS menu on the left and scroll down to Authentication.
In the Auth Called Station ID Type field, select “System MAC Address”.
In the MAC Delimiter field, select “Colon”.
Click New in the top right corner to add the Radius Server for authentication.
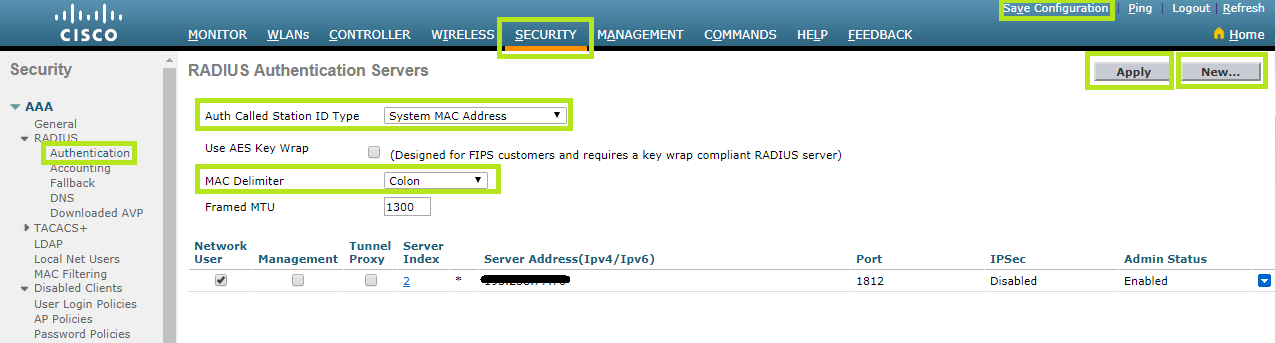
Now configure RADIUS Authentication Servers as follows:

Click Apply and Save configuration to save the entries.
In order to configure RADIUS server for accounting, select the Security menu at the top. Then, click AAA > RADIUS on the left and scroll down to Accounting.
In the Auth Called Station ID Type field, select “System MAC Address”.
In the MAC Delimiter field, select “Colon”.
Click New in the top right corner to add RADIUS server for accounting.
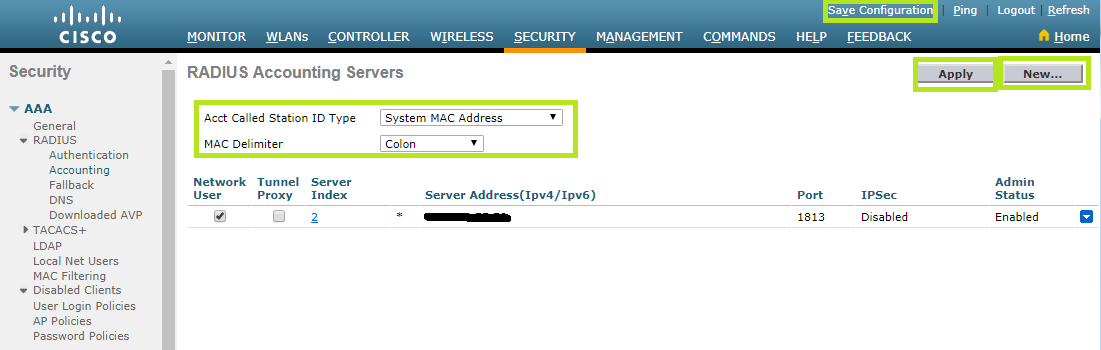
Now configure RADIUS Authentication Servers as follows:
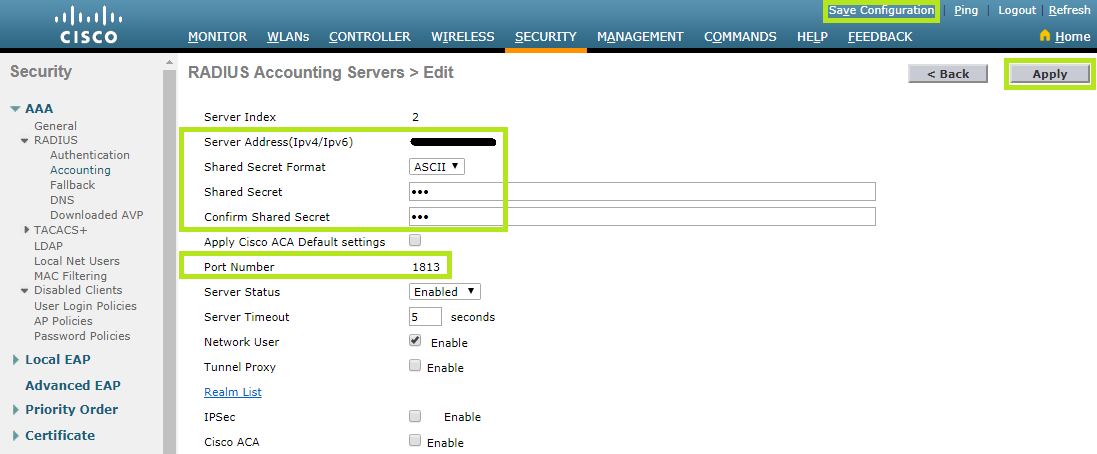
Click Apply and Save configuration to save the entries.
Click the Security menu at the top. Then click theWeb Authmenu on the left and scroll down to Web Login Page.
In the Web Authentication Type field, select “External”.
In the External Webauth URL field, enter http://YourHSNM_IP_OR_DOMAIN/portal/index.php?domainname=YourDomainName&hotspotname=YourHotspotName&ciscowlc=
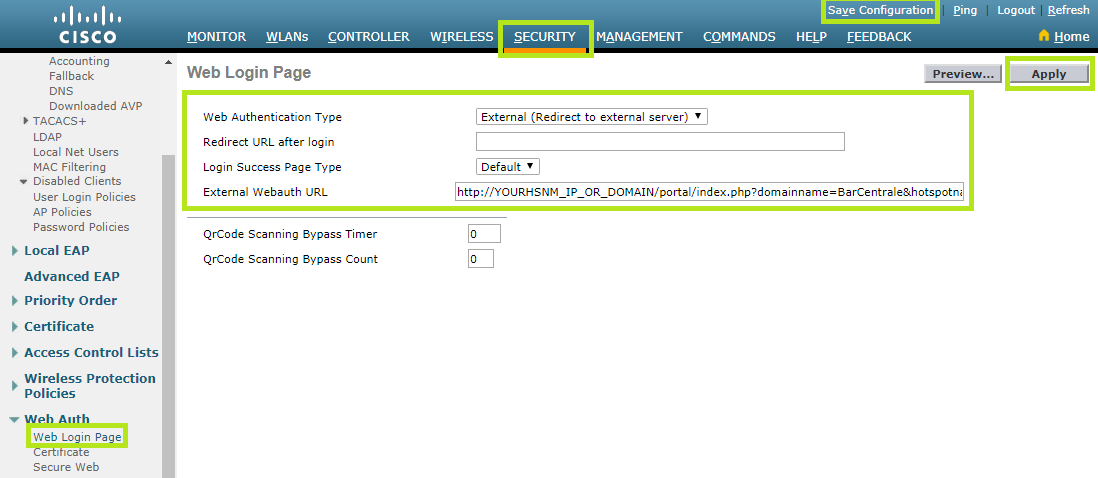
Click the Apply to save the entry.
An Access Control List (ACL) is a set of rules used to limit the access to a particular interface.
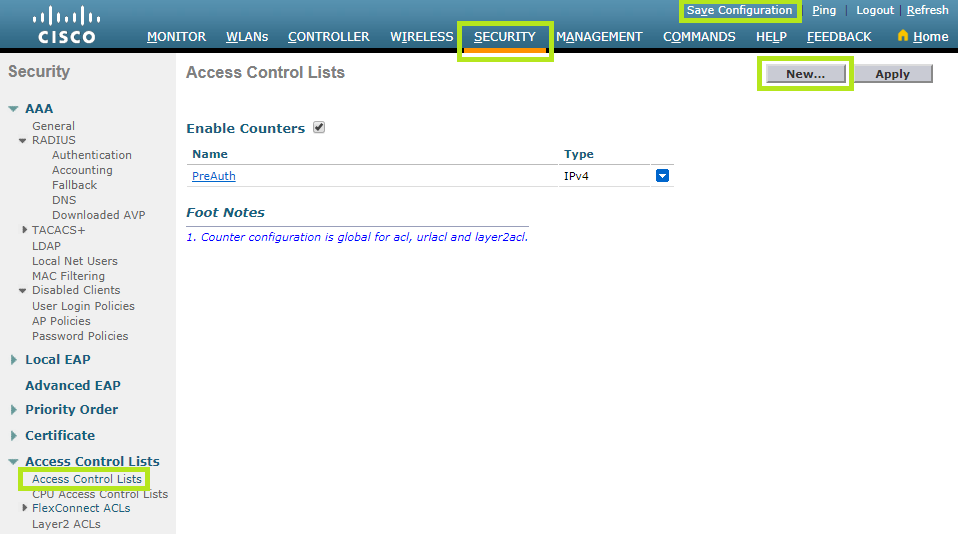
In order to configure the ACL, click the Security menu at the top. Then click the Access Control Lists menu on the left and scroll down to Access Control Lists.
In this case, it is necessary to set two access lists, Outbound and Inbound, in order to reach HSNM.
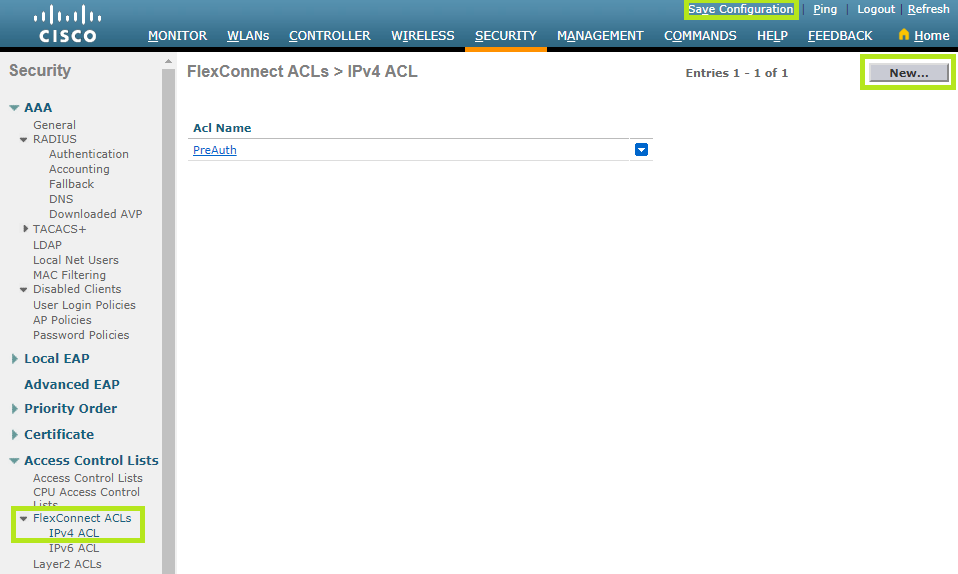
Click FlexConnect ACLs on the left and then scroll down to IPv4 ACL.
On the top right corner, click the Add Rule button and then select IP Rule. Non you can enter the two network classes in order to send and receive data.

From the IPv4 ACL menu, you can also configure the walled garden. Just click the Add Rule button, in the top right corner, and then select URL Rule.
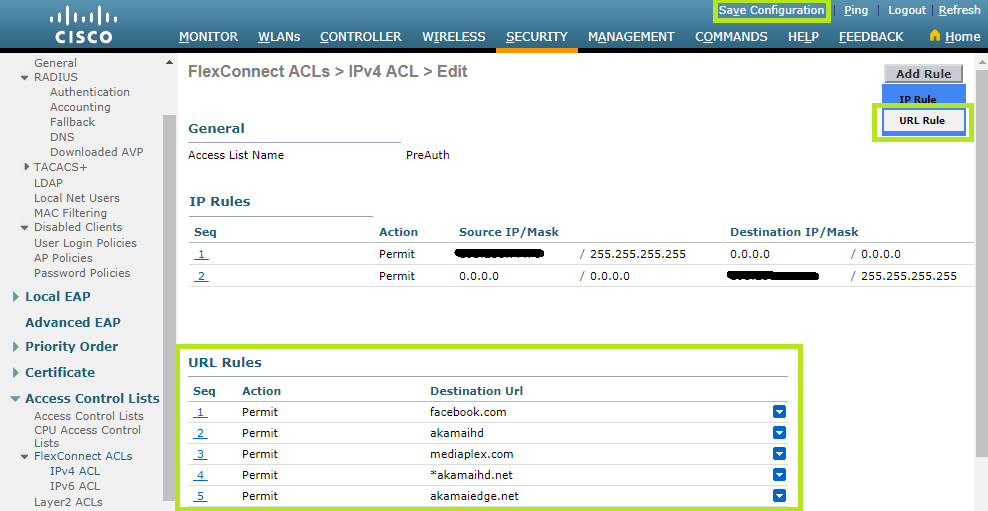
URL rules are limited to 20 entries. If you require more than 20, you need to configure IP rules in order to be able to reach the desired networks during the pre-authentication phase.
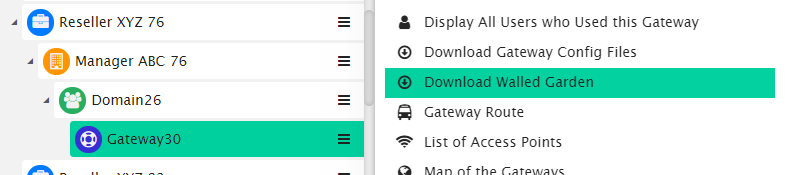
To know the accurate and relevant Walled Garden you need to add one by one, access your HSNM platform and click the contextual dropdown menu of your gateway. Select Download Walled Garden to get a .txt file with your accurate walled garden list as shown Figure Download Walled Garden.
Once completed, click Save Configuration in the top right corner.
You need to authorize an access point to perform traffic according to the policies just configured.
To do that, click Security at the top. From the AAA menu on the left, select Disabled Clients > AP Policies.
In the Policy Configuration section, tick “Accept Self Signed Certificate (SSC)” and “Accept Manufactured Installed Certificate (MIC)”.
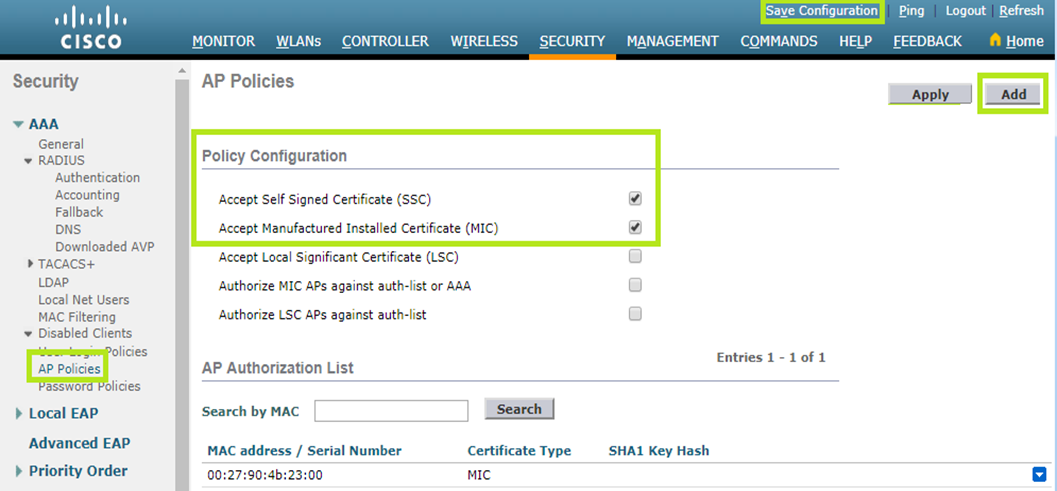
Click the Add button to access the Add AP to Authorization List section. In the MAC address field, enter your AP MAC address. In the Certificate Type field, select “MIC”.

Once completed, click the Add button below.
To save the entries, click the Apply button and then Save Configuration at the top.
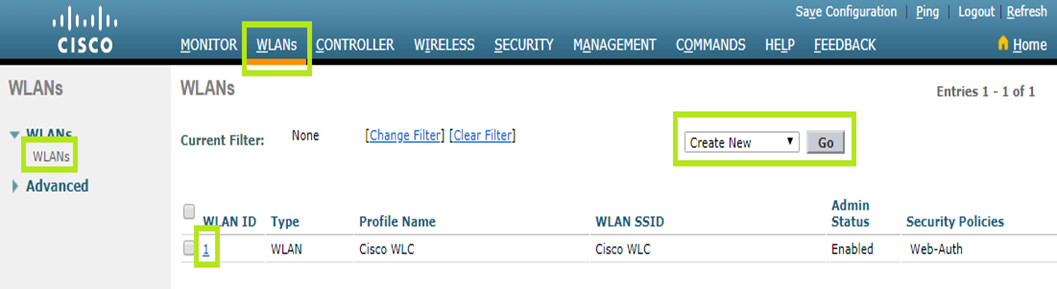
You can view WLANs currently configured by clicking the WLANs menu at the top and then WLANs on the left.
To configure WLANs, two options are available:
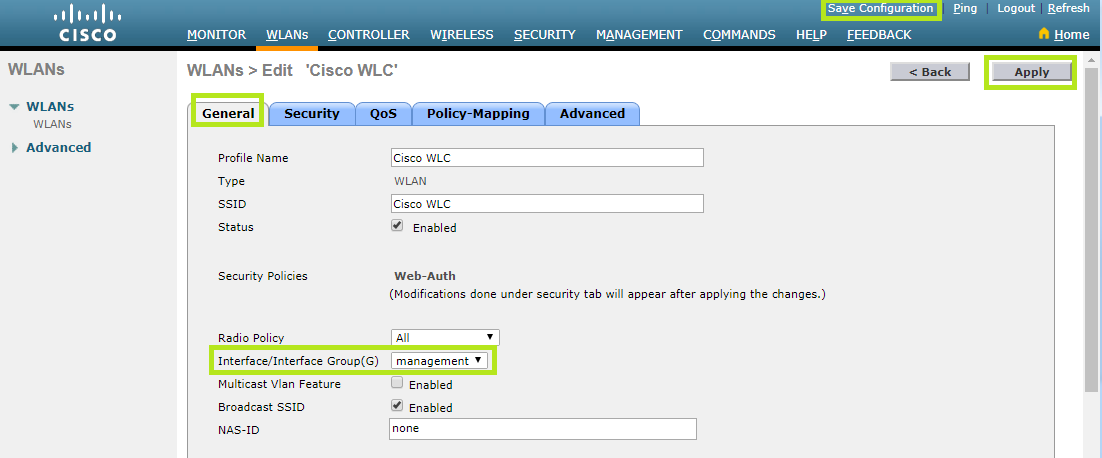
Under the General tab, select “management” as Interface/Interface Group(G).
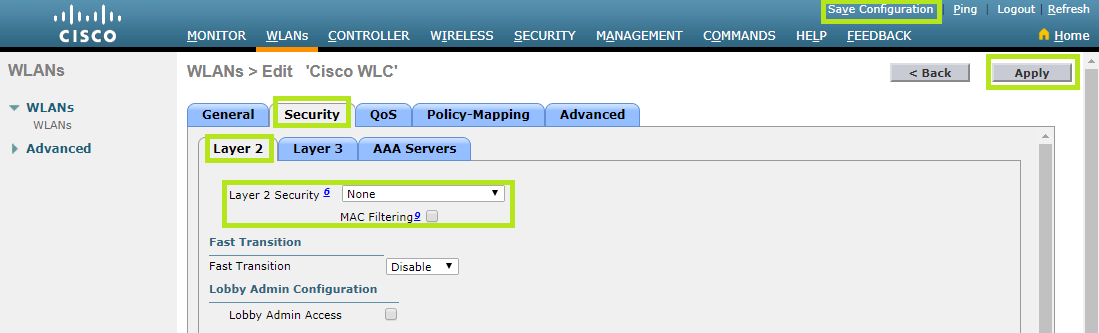
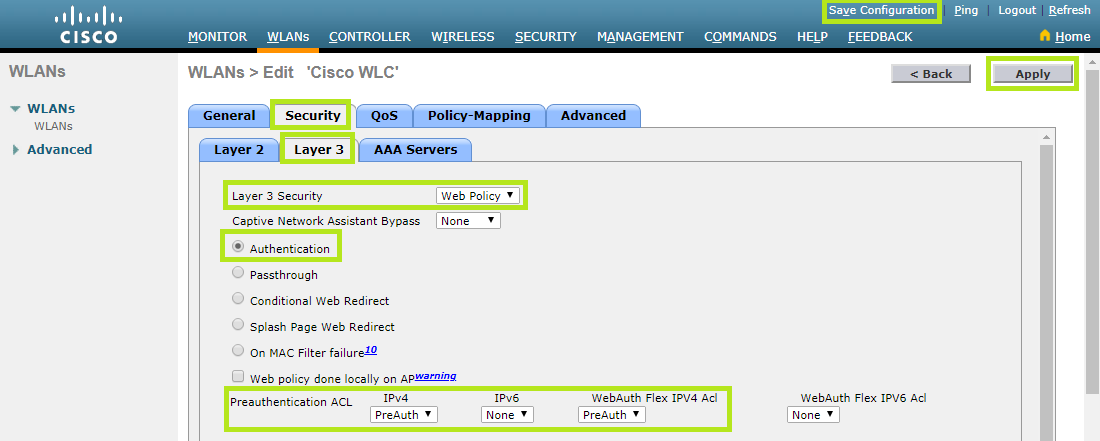
Then, move to the Securitytab and select the Layer 2 section. In the Layer 2 Security field, select “None”.
Now move to theLayer 3section. In the Layer 3 Security field, select “Web Policy”. Below, tick “Authentication”.
Set the WebAuth Flex IPV4 Acl field only after completing steps 9 and 10.
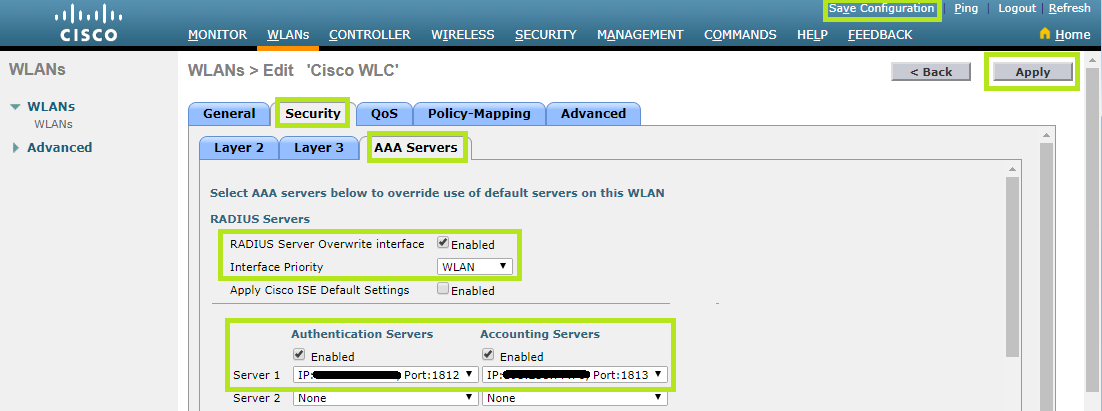
From the Security tab, select the AAA Servers section. Enable the RADIUS Server Overwrite interface and select “WLAN” in the Interface Priority field.
Under Authentication Servers and Accounting Servers, you can set the Radius Servers previously created in “Configuring the Radius Authentication” and “Configuring the Radius Accounting”.
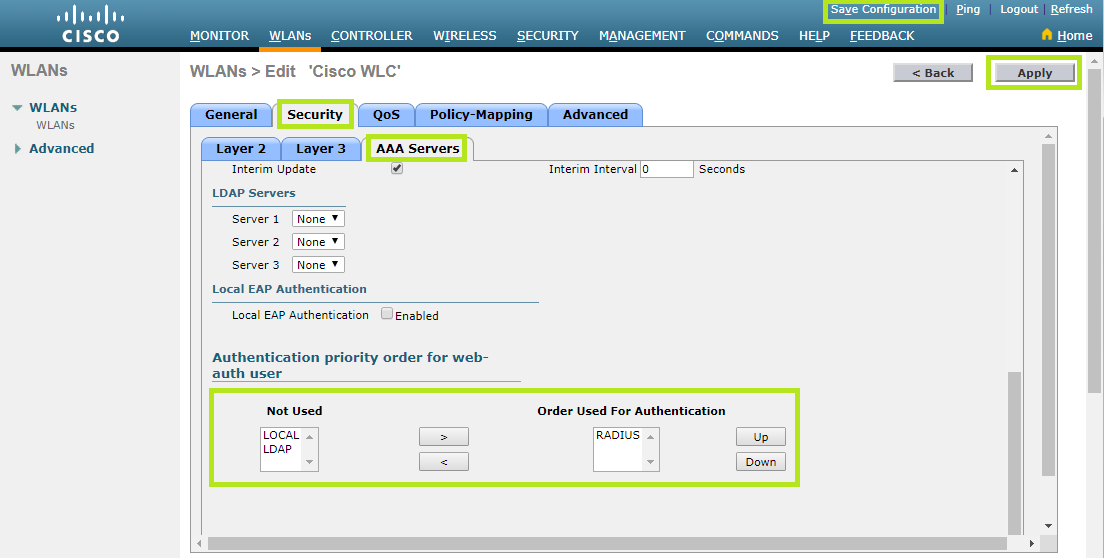
Scroll down to Authentication priority order for web-auth user section and make sure that “RADIUS” is set as the only item.
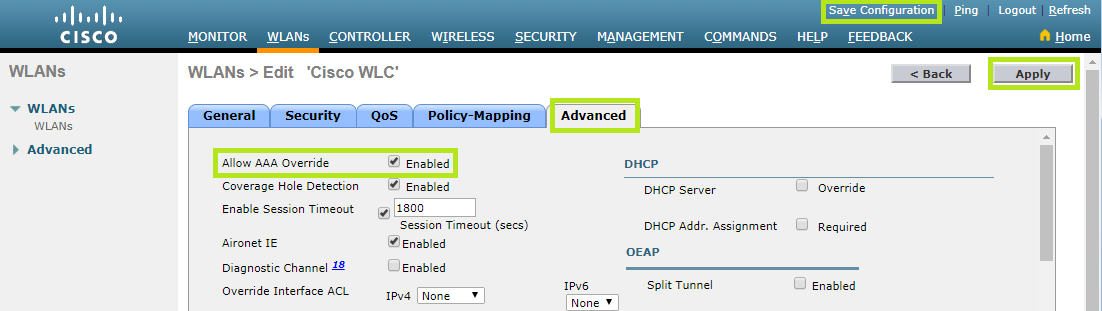
From the Security tab, move to the Advanced tab. Enable Allow AAA Override.
Scroll down to the FlexConnect section and enable FlexConnect Local Switching 2and Learn Client IP Address 5.
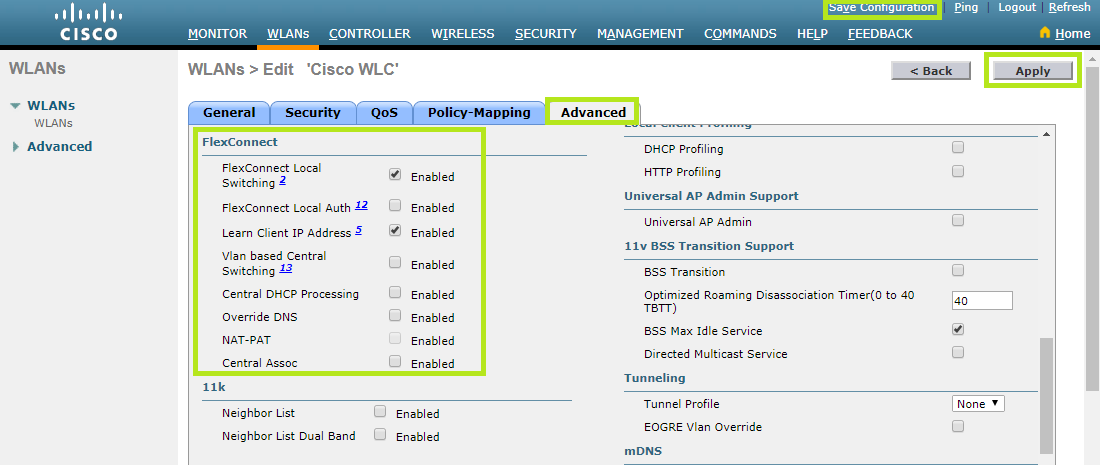
Once completed, click the Apply button and then Save Configuration.
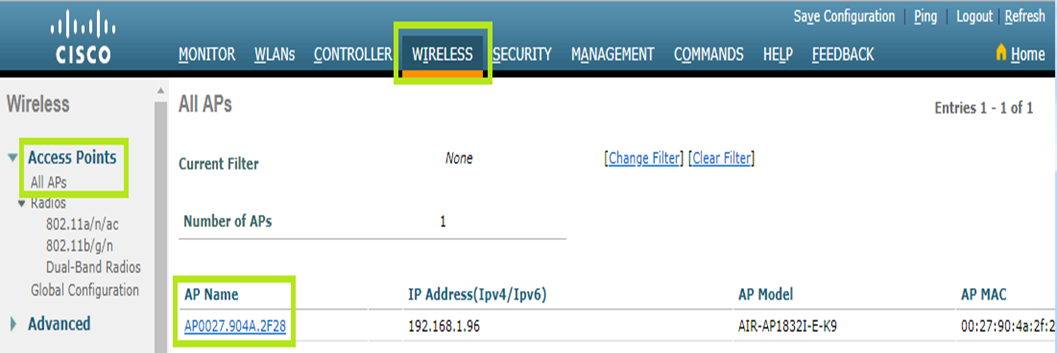
Click the Wireless menu and select Access Points > All APs on the left.
Click the AP Name of each AP you need to apply ACLs to.
Starting from the General tab, select FlexConnect in the AP Mode field.
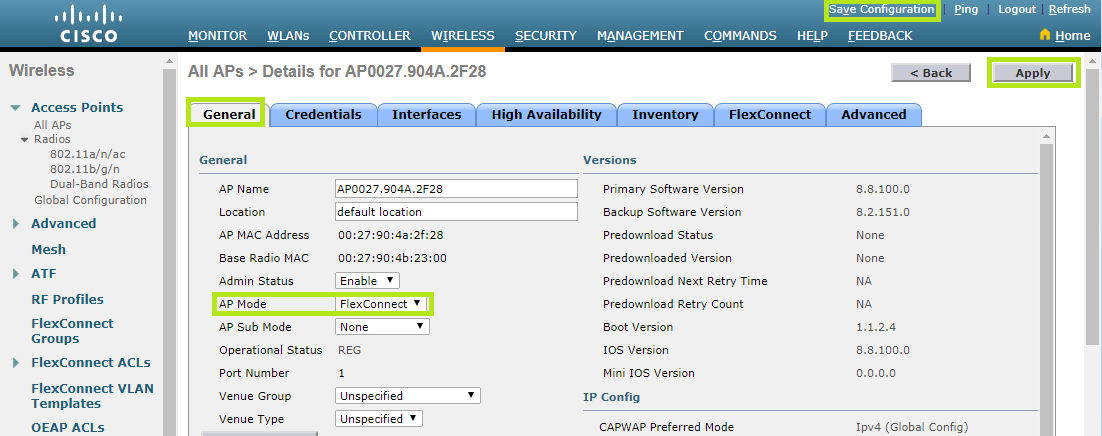
Click the Apply button to save the entry.
Move to the FlexConnect tab. Tick WLAN Support, then enter “1” in the Native VLAN ID field.
Scroll down to PreAuthentication Access Control Lists and click External WebAuthentication ACLs.
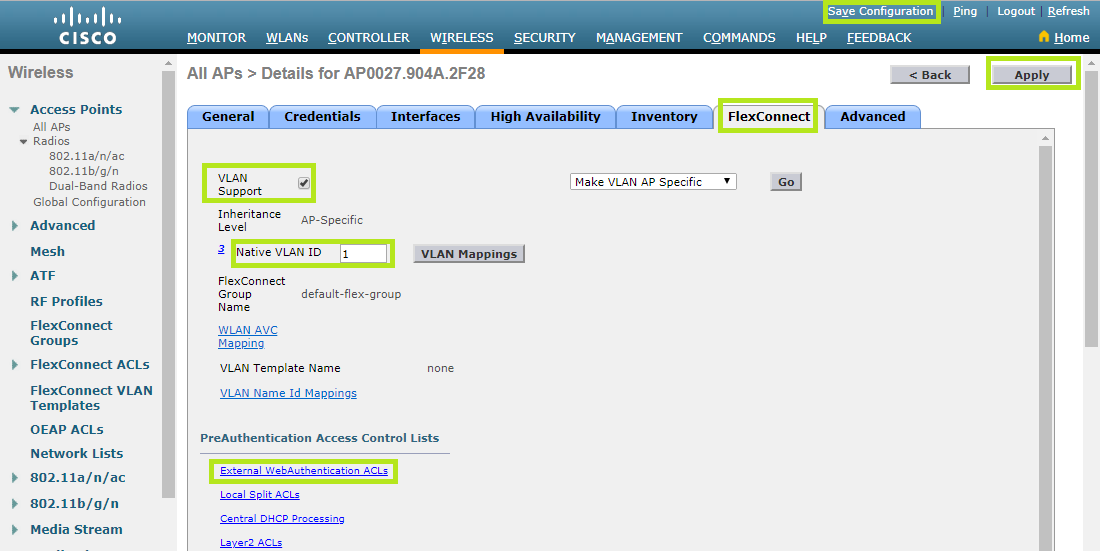
Here you have to set ACLs you have previously created to both WLAN and Policies section. The image below shows all the steps.
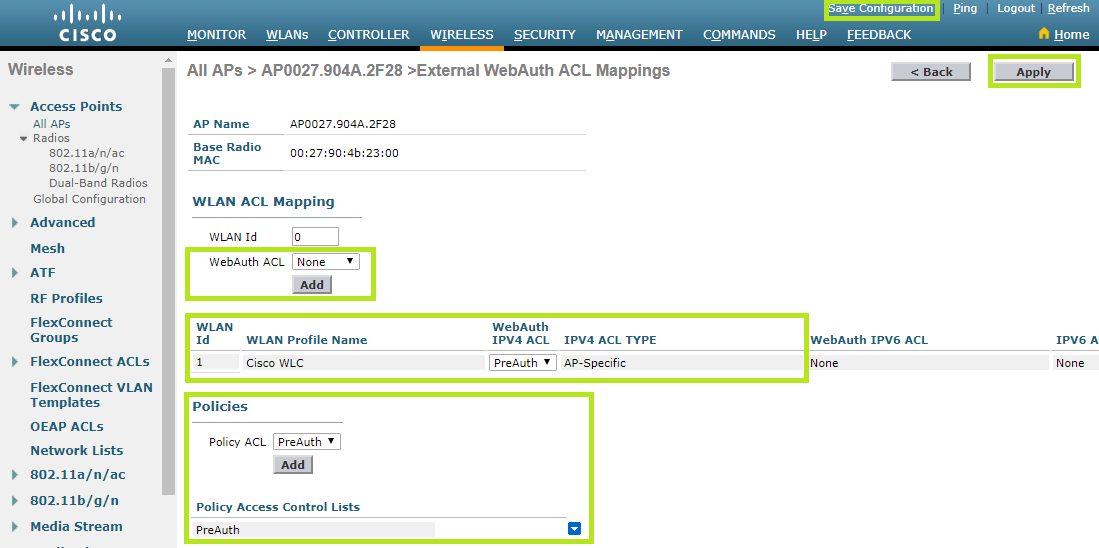
To save the entries, click the Apply button and then Save Configuration at the top.
Click the Controller menu at the top and then General on the left. Then, select “PAP” in the Web Radius Authentication field and set an IP address in the DNS Server IP (IPv4/IPv6) field.

Once completed, click the Apply button and then Save Configuration.
HTTPS
You need to add an SSL certificate if you have enabled HTTPS in the controller and in case:
At the following URL, https://www.cisco.com/c/en/us/td/docs/wireless/controller/8-0/configuration-guide/b_cg80.html, you can find Cisco documentations providing steps to correctly configure the controller with an SSL certificate.
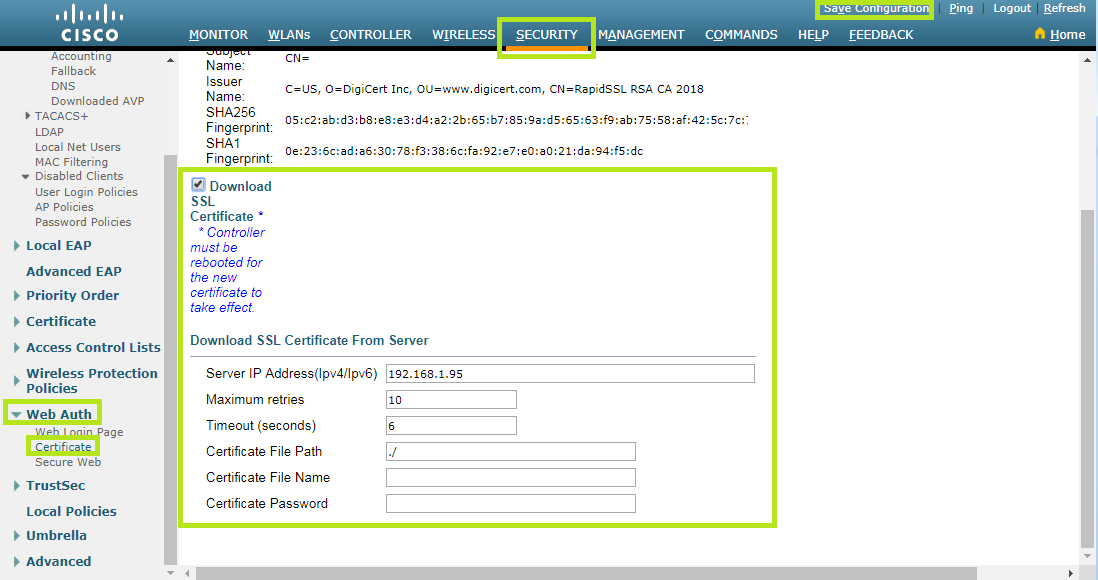
From the Security menu at the top, select Web Auth > Certificate.
Now tick Download SSL Certificate as shown below.
Once completed, click Save Configuration.
SSL certificate must be uploaded through a TFPT server.
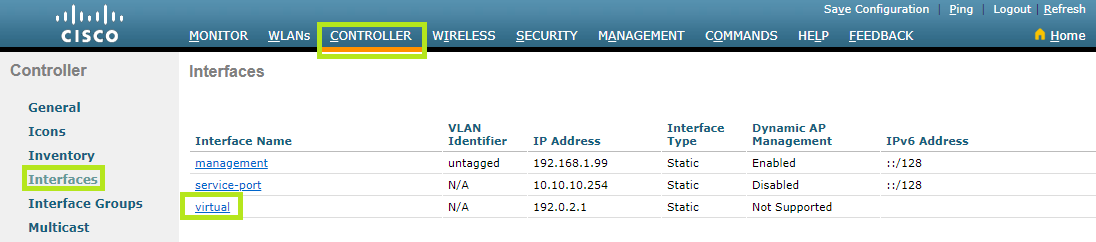
Select the Controller menu at the top and then click Interfaces on the left. Now find and click “virtual” below Interface Name in order to edit it.
In the DNS Host Name field, set a third level domain name for your HSNM domain.
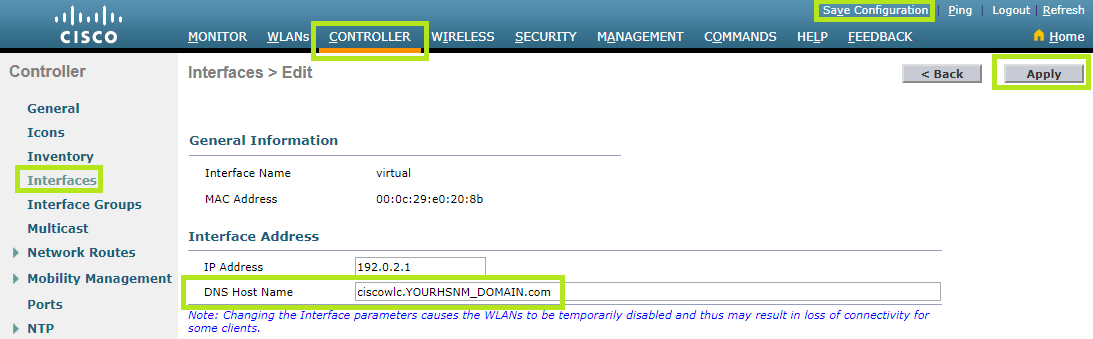
In this case you need to apply for a wildcard certificate (*.HSNMDOMAIN.com) from a CA (Certificate Authority). In this way, you can set, for example:
Create an hostA record that points to your Cisco WLC virtual interface IP Address.
Please, read carefully Cisco documentation in order to set a right IP Address in the IP Address field of the virtual interface.
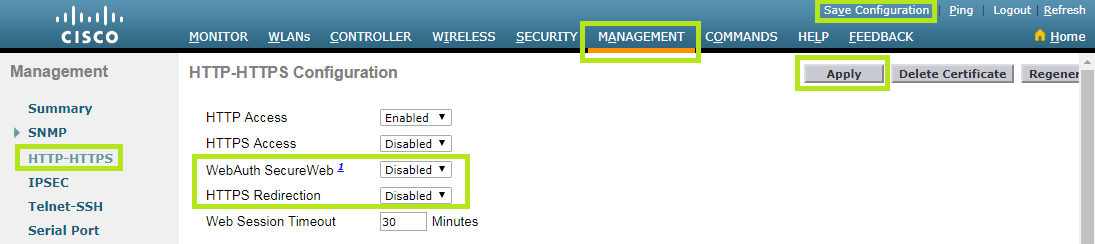
Select the Management menu at the top and then click SNMP > HTTP-HTTPS on the left.
Now, enable WebAuth SecureWeb. If you want users to be redirected to the Welcome Portal even when trying to surf an https website, enable HTTPS Redirection.
Once completed, click the Apply button and Save Configuration.
Then, you need to reboot Cisco WLC from the Commands menu for the new certificate to take effect.
To correctly add an SSL certificate in your HSNM, you can refer to the HSNM Administration Manual available in the “Documentation” section of your HSNM.