Configuring Huawei iMaster NCE Campus Controller
This chapter describes how to configure Huawei iMaster NCE Campus controller.
Before proceeding further with the configuration, you need to configure HSNM with a domain and a gateway as described in Adding a New Gateway.
Prerequisites
The prerequisites required for configuration are:
- Cloud iMaster NCE Campus ready
- Huawei AP and its serial adopted
- HSNM version >= 9.3.x
- HSNM gateway configured with Huawei Huawei iMaster NCE-Campus controller in the Hardware Type
- Cloud iMaster NCE-Campus controller must be reachable on both UDP ports 3800 and 3801
Step 1
Now inside HSNM, select your Gateway, click the dropdown menu, choose Edit.
Step 2
Expand the General Data session.
Step 3
In the Hardware Type field, choose Huawei iMaster NCE – Campus Controller.
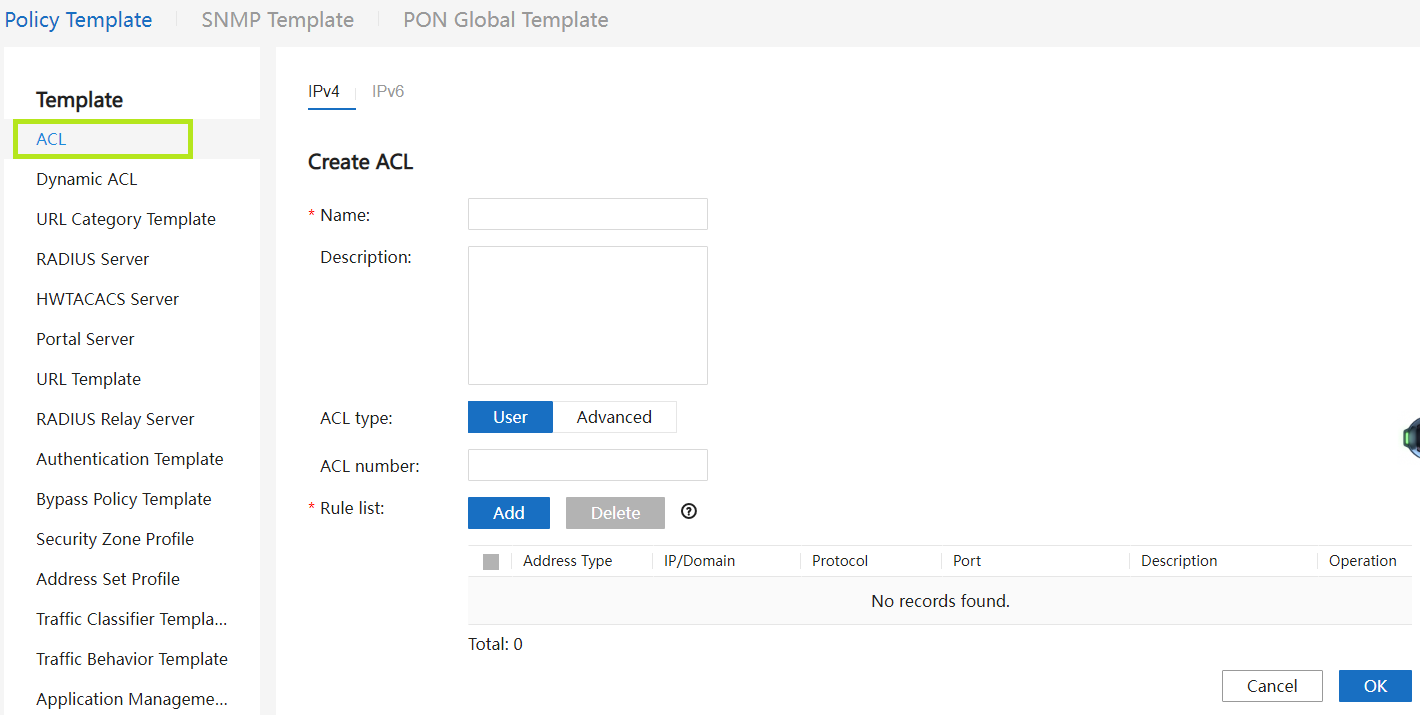
Configuring the Access Control List
Step 1
Log in to your iMaster NCE Campus controller interface router.
Step 2
At the top, click the Design > Template Management.
Step 3
On the left, select ACL and then Create on the right.
Step 4
Enter the details as follows:
- Name–Edit the name
- ACL Type–Tick User
Step 5
Under Rule List click Add.
Step 6
Insert here your access domain to your HSNM platform.
Step 7
Add one by one the IP address or domains you need for social login, payments, etc.
Step 8
Click OK to save the entry.
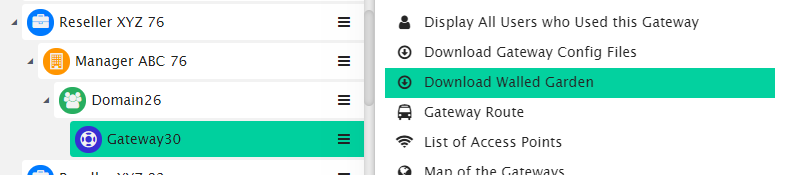
To know the accurate and relevant Walled Garden, you need to add one by one, access your HSNM platform and click the contextual dropdown menu of your gateway. Select Download Walled Garden to get a .txt file with your accurate walled garden list as shown Figure Download Walled Garden.
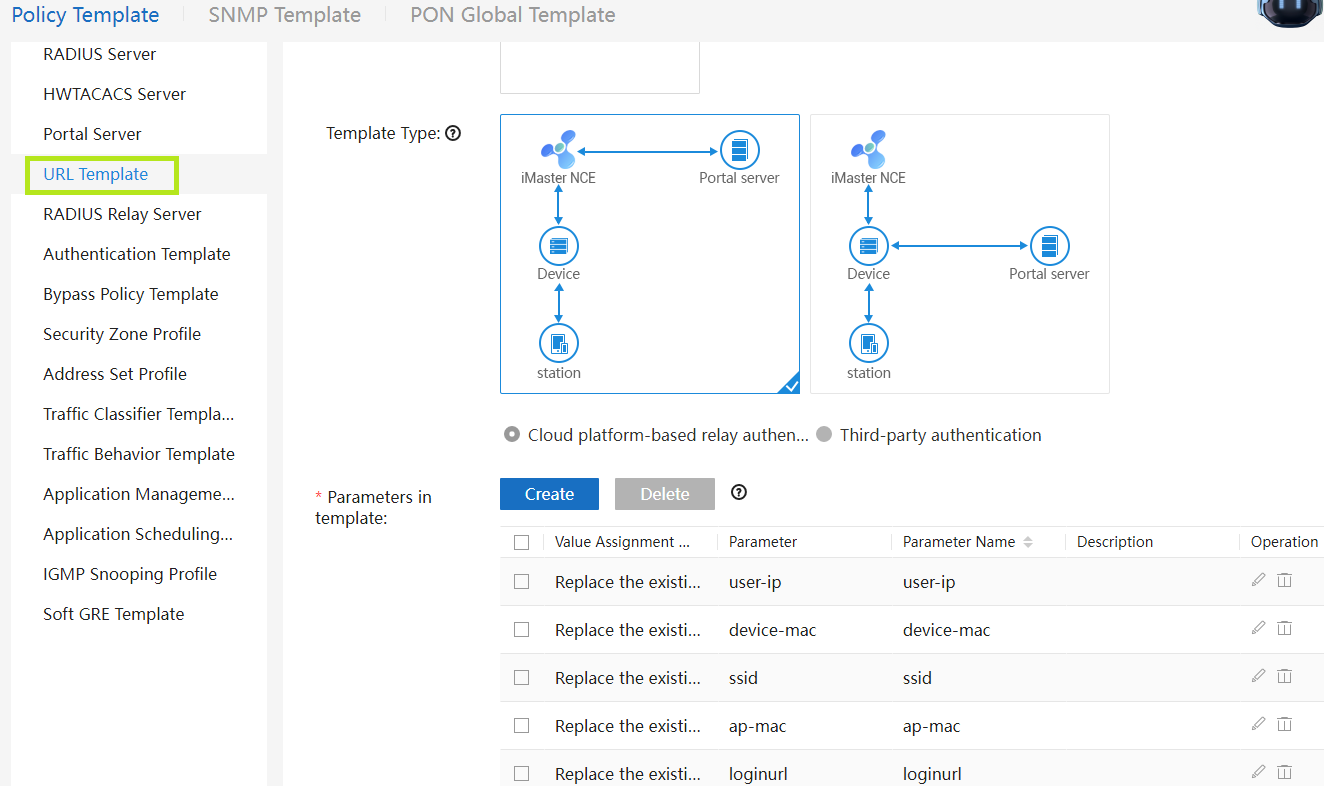
Configuring the Template
Step 1
On the left, click the URL Template.
Step 2
On the left, click on Create on the right.
Step 3
Enter the details as follows:
- Name–Edit the name
- Template Type–Select Cloud platform-based relay authentication
Step 4
Under Parameters in Template click Create and configure with:
- Value Assignment Mode–Replace the existing value of the controller
- Parameter–loginurl
- Parameter Name–loginurl
Step 5
Tick the tick icon to add the parameter. You need to add the following parameters too:
- Value Assignment Mode–Replace the existing value of the controller
- Parameter–ap-mac
- Parameter Name–ap-mac
- Value Assignment Mode–Replace the existing value of the controller
- Parameter–ssid
- Parameter Name–ssid
- Value Assignment Mode–Replace the existing value of the controller
- Parameter–device-mac
- Parameter Name–device-mac
- Value Assignment Mode–Replace the existing value of the controller
- Parameter–user-ip
- Parameter Name– user-ip
Step 6
Click OK to save the entry.
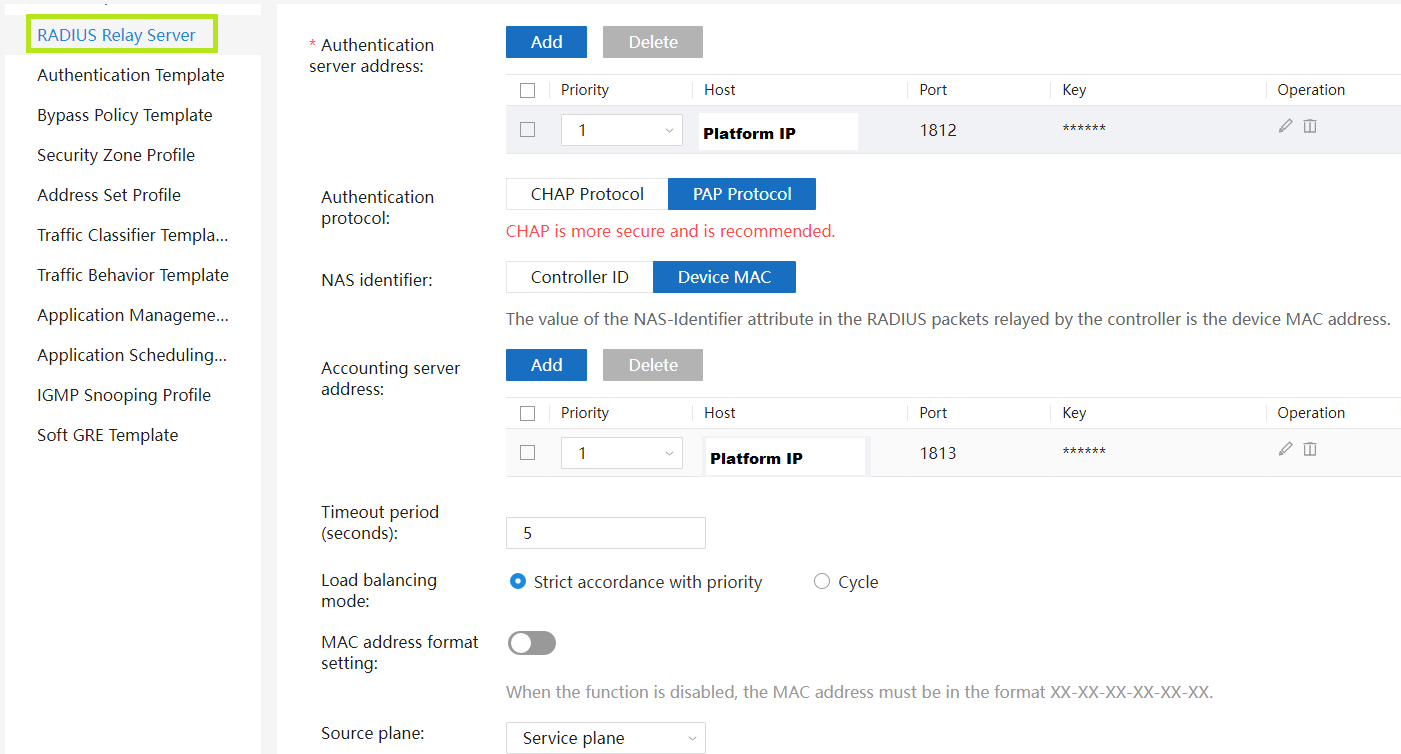
Configuring the Radius Server
Step 1
On the left, click the RADIUS Relay Server.
Step 2
On the left, click on Create on the right.
Step3
Enter the details as follows:
- Name–Edit the name
- Authentication service–Select Portal authentication
Step 4
Under Authentication server address click Add and configure with:
- Priority–1
- Host–insert HSNM IP here
- Port–1812
- Key–Enter the radius secret
Step 5
Tick the tick icon to add the parameter.
Step 6
In the Authentication protocol, select CHAP Protocol.
Step 7
In the NAS identifier, select Device MAC.
Step 8
Under the Accounting server address click Add and configure with:
- Priority–1
- Host–insert HSNM IP here
- Port–1813
- Key–Enter the radius secret
Step 9
Tick the tick icon to add the parameter.
Step 10
Leave the details as follows:
- Timeout period (seconds)–5
- Load balancing mode–Strict accordance with priority
- MAC address format setting–Unticked
- Source plane–Service plane
Step 11
Click OK to save the entry.
Adding an AP to the Controller
Step 1
At the top, click the Provision > Site Configuration.
Step 2
On the left, select AP > SSID. Then click Create on the right.
Step 3
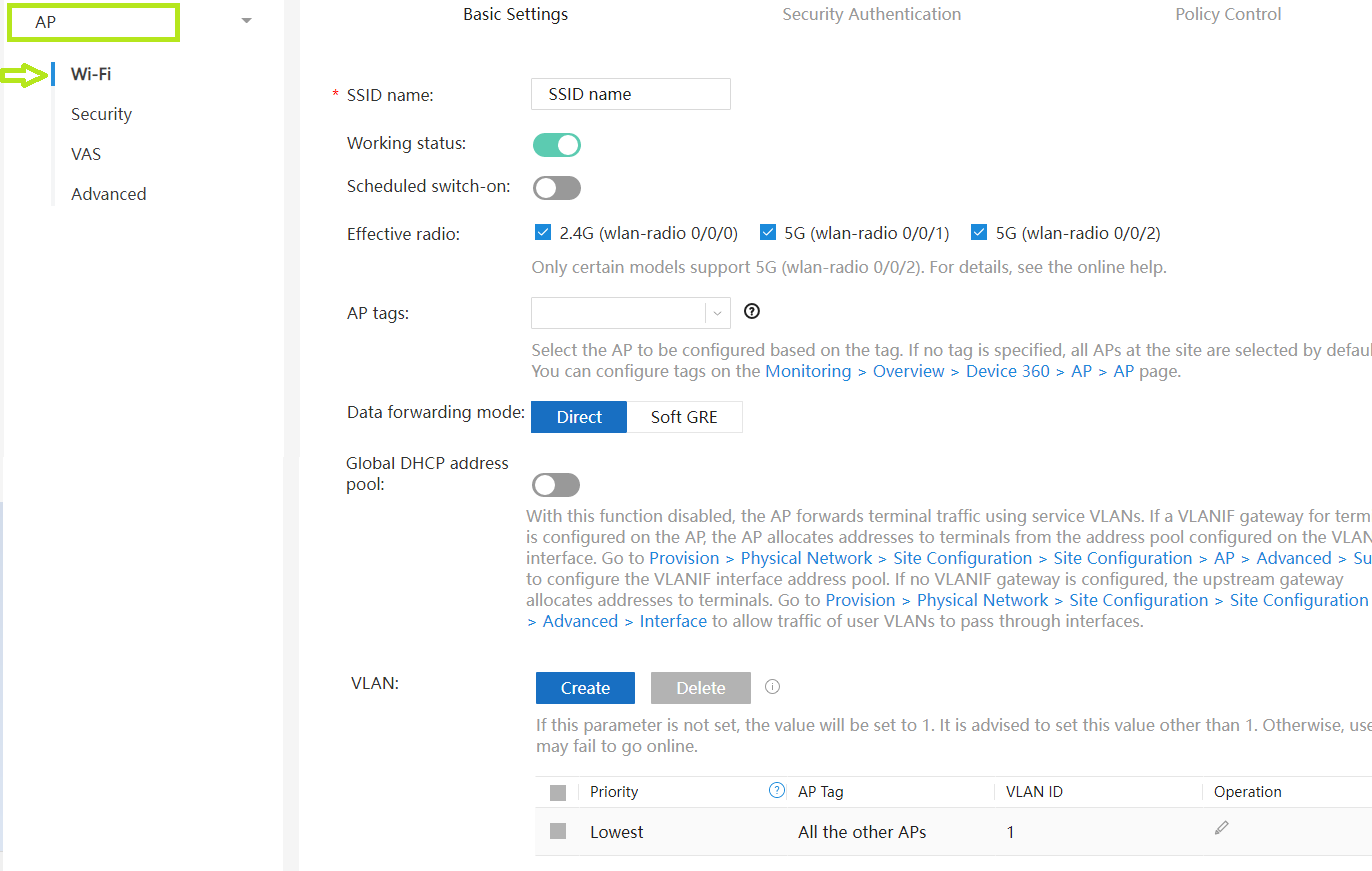
Enter the details as follows:
Step 4
- SSID Name–Edit the name
- Working status–Tick On
- Effective radio–Tick 2.4G (wlan-radio 0/0/0), 5G (wlan-radio 0/0/1)and 5G (wlan-radio 0/0/2)
- Data forwarding mode–Tick Direct
- Global DHCP address pool–Leave Disabled
Step 5
Tick the tick icon to add the parameter.
Step 6
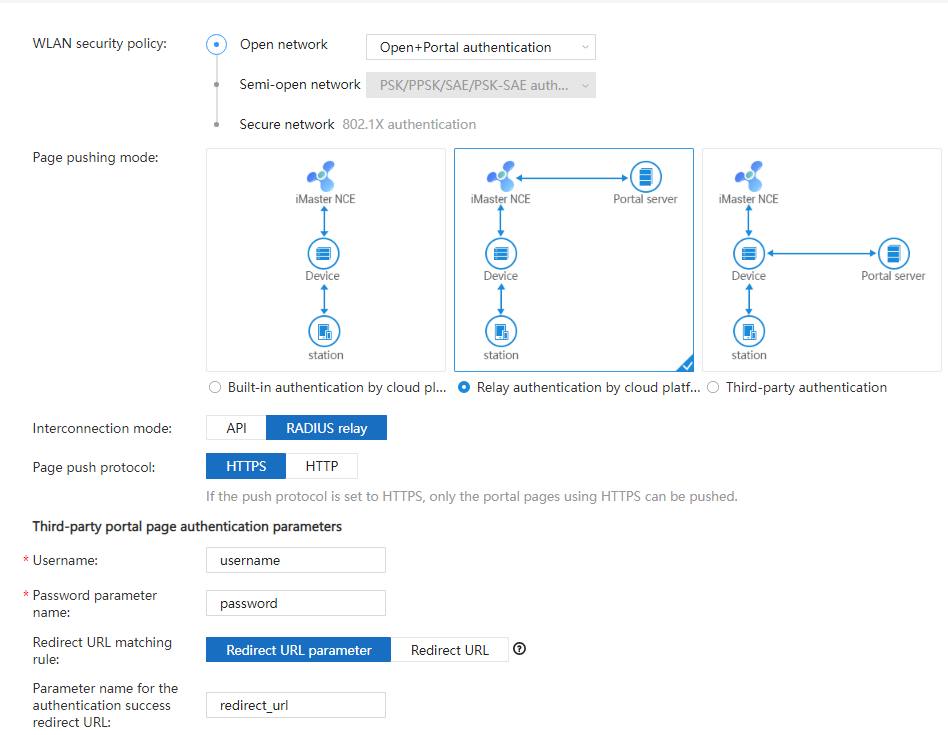
Click Next and configure with configure with:
- WLAN security policy–Tick Open network
- Portal pushing mode–Tick Relay authentication by cloud platform
- Interconnection mode–Tick RADIUS relay
- Page push protocol–Tick HTTPS
- Username–Type username
- Password parameter name–Type password
- Redirect URL matching rule–Tick Redirect URL parameter
- Parameter name for the authentication success redirect URL–Type redirect_URL
- RADIUS relay server–Select the Radius server you previously created
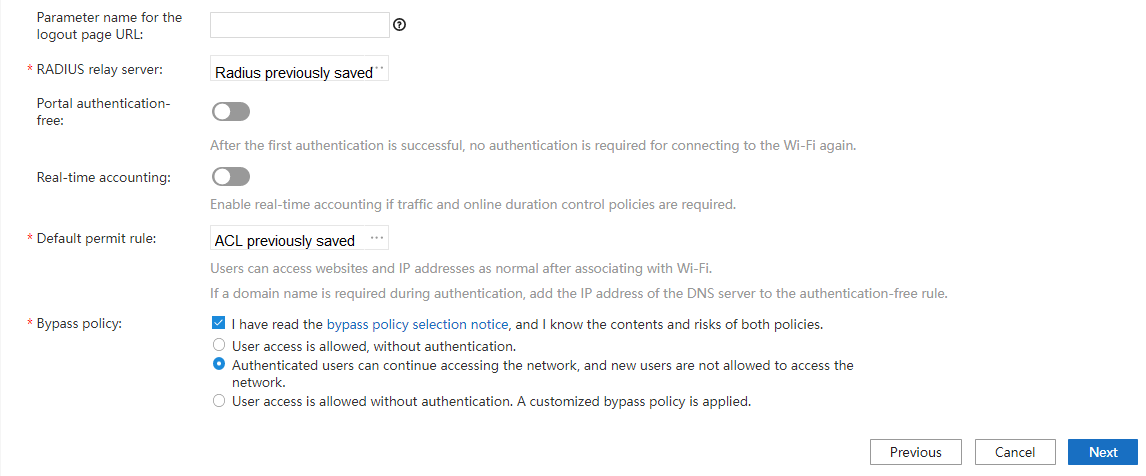
- Portal authentication free–Leave Disabled
- Real-time accounting–Leave Disabled
- Default permit rule– Select the ACL you previously created
- Bypass policy–Tick I have read… and tick Authenticated users can continue accessing the network
Step 7
Click Next and leave all the fields disabled.
Step 8
Click OK to save the entry.
Adding the Portal Page Push Policy
Step 1
At the top, click the Admission > Page Management.
Step 2
Click Portal Page Push Policyat the top.
Step 3
Then click Create at the top-right corner.
Step 4
Enter the details as follows:
- Name–Edit the name
- Access Mode–Tick Wireless
- Match SSIDs–Tick Yes
- SSID–Click Add and enter the SSID you created earlier
- Authentication mode –Choose Cloud platform-based relay authentication
- Interconnection mode–Tick Radius
- URL template–Select the URL template you created earlier
- Third-party authentication URL–Enter the http://HSNM_DOMAIN_OR_IP/
- portal/index.php?domain=DomainName&hotspotname=HotSpotName where HSNM_DOMAIN_OR_IP stands for the public IP address of your HSNM or the IP to reach it and, GATEWAY_NAME_SET_IN_HSNM stands for the name you set for your Gateway in the HSNM configuration.
Step 5
Click OK to save the entry.
Now you have completed the configuration.