Gateway & AP – Set-Up Guide
This chapter describes how to configure Ubiquiti with no USG, version equal to or greater than 5.12.66.
Before proceeding further with the configuration, you need to configure your HSNM with a domain and a gateway as described in Adding a New Gateway.
The prerequisites required for configuration are:
When you set the Secret Radius in your HSNM do not exceeds 12 digits code and do not use symbols, otherwise UniFi will not send it correctly.
Login to your Unifi controller and click the Settings icon on the bottom left.
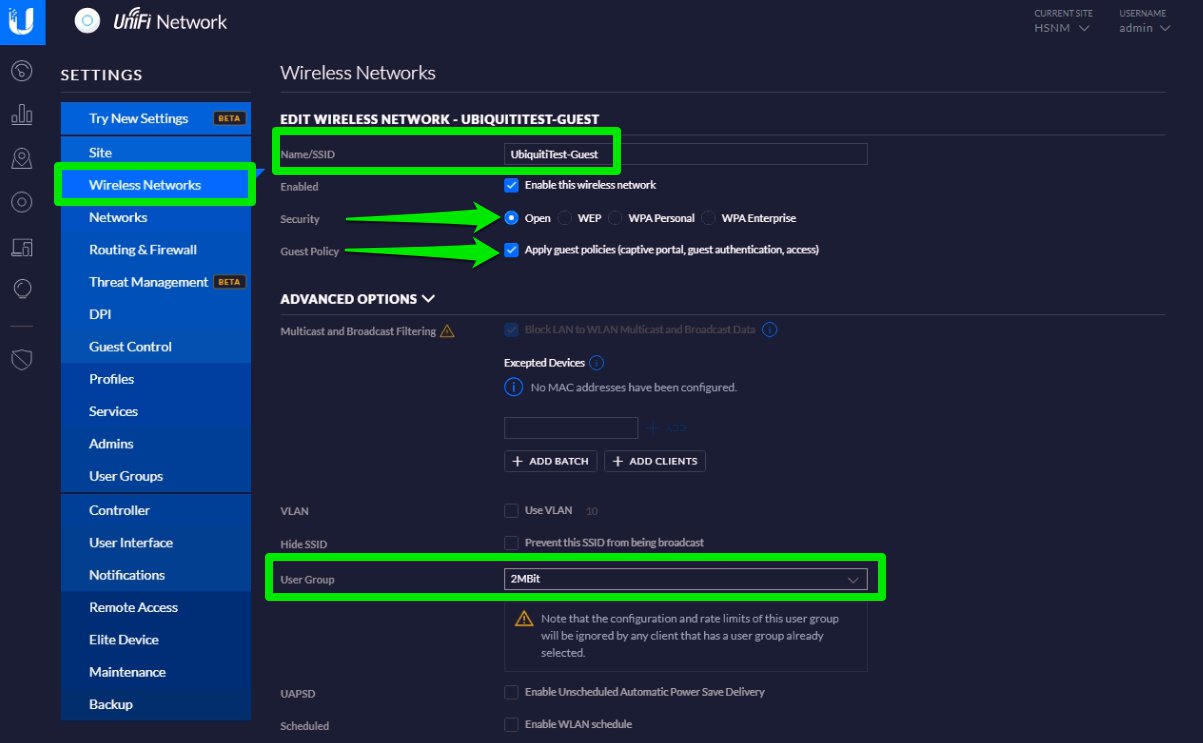
On the left menu, scroll down to Wireless Networks and click Create New Wireless Network.
Configure with:
Optional: expand the Advanced Options session and select the User Group (traffic shaping) that you will configure in the “User Group (Option)” paragraph.
Once completed, click the Save button to save the entry.
On the left menu, select Profiles and create the Radius profile.
In the Radius Profile header, enter the details as follows:
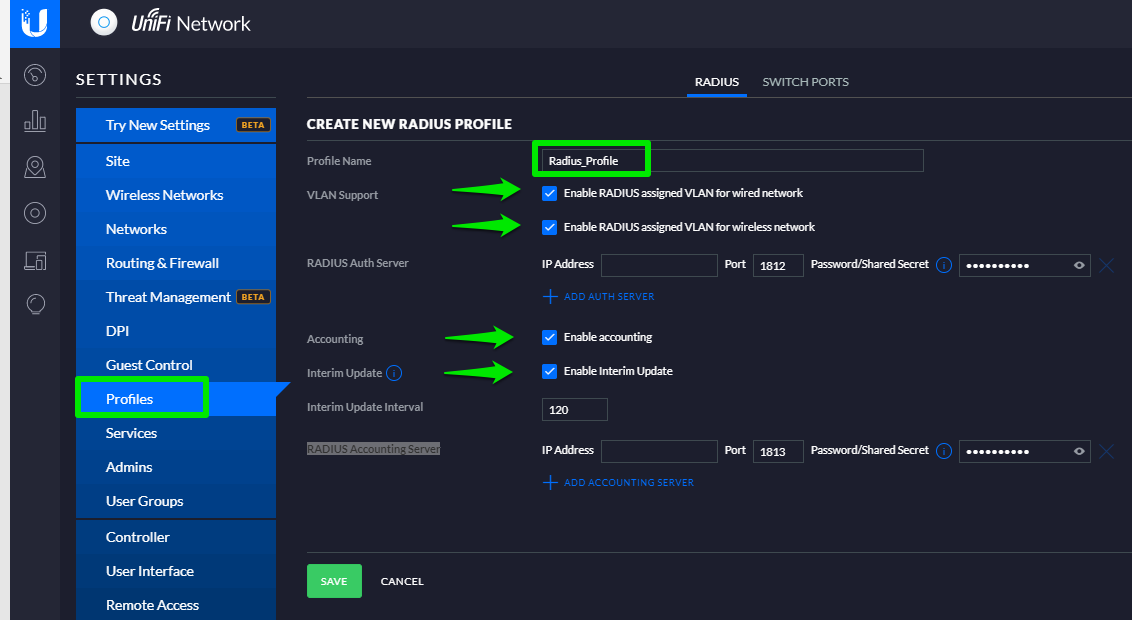
In the IP Address fields enter the public IPs of the Radius server of your HSNM Radius and its relevant Secret.
In order to add the Secret you need to get it from your HSNM as described in the Radius Secret paragraph.
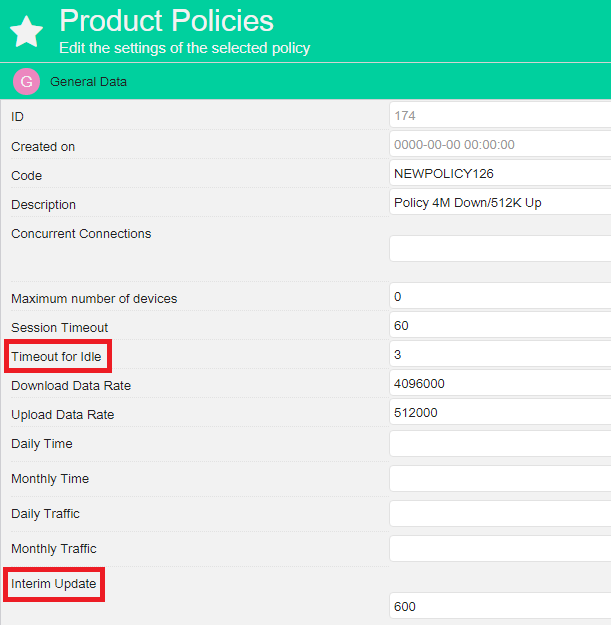
Troubleshoot: Interim Update
It will use the value you edit here and not the value you enter in the Product Policy. This value must be equal to or lower than the value entered in the products you set up for the users.
Ubiquiti UniFi Controller does not support or has errors in accounting radius. The data is correct only if the system is able to reach the UniFi controller (normally with NAT or VPN rules) and compensate directly for failings. If not possible, we recommend you to use this type of gateway only to authenticate users. You cannot parametize the user data rate in the Products, you can define it only in the controller.
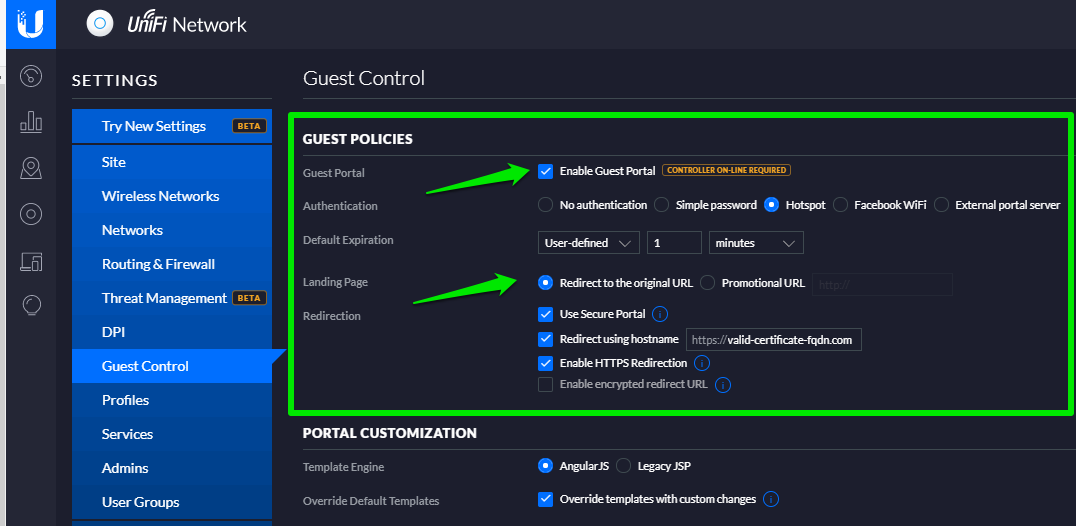
Now, you need to set up the guest policies. From the Settings menu on the left, open the Guest Control page.
In the Guest Policies header, enter the details as follows:
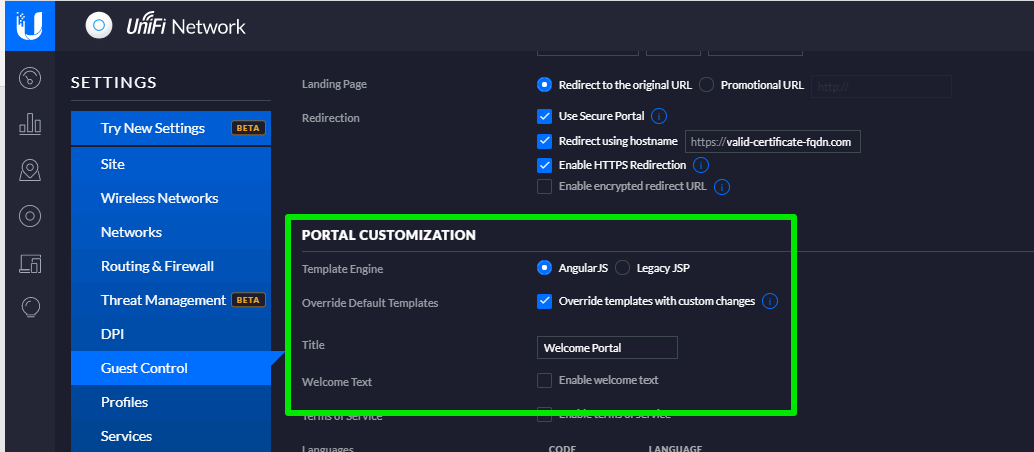
Once you have completed the above steps, in the Portal Customisation header, enter the details as follows:
Ignore any update message about portal customization.
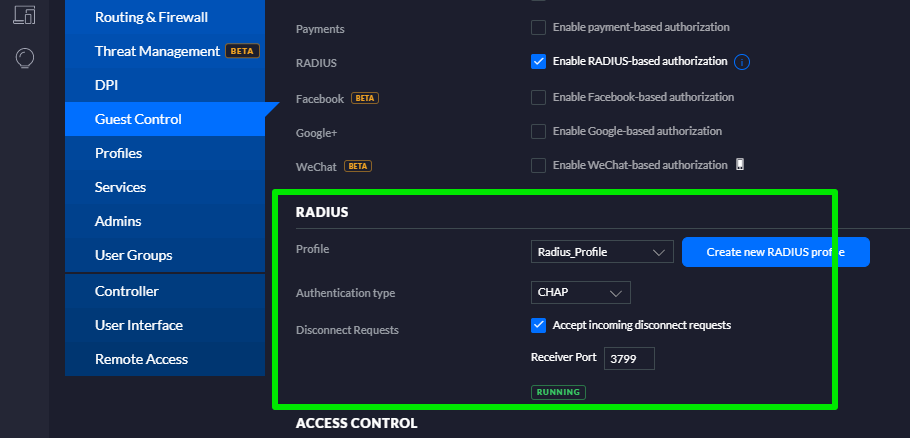
Now in the same page, the next step is to set up the Radius authentication and access control.
In the Hotspot header, tick Enable RADIUS base authorisation

In the Radius header, enter the details as follows:
In the Access Control header, in the Pre-Authorization Access fields configure with:
In the access control section, always enter IPs with CIDR notation even for individual IPs (e.g. 1.1.1.1/32).
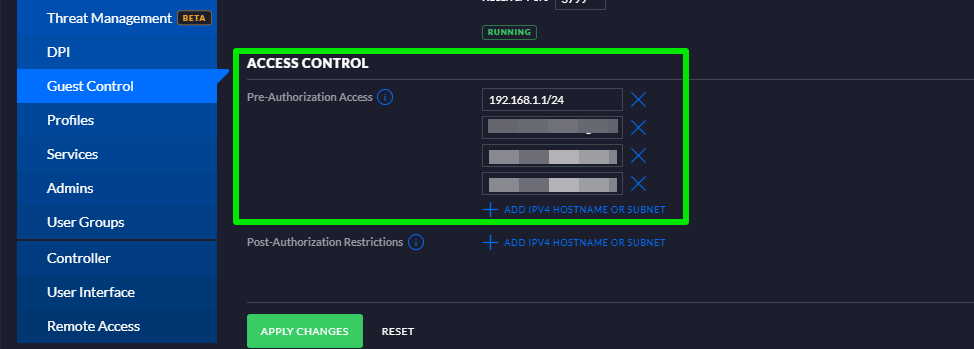
Upon completion of the above steps, click the Apply Changes button to finish.
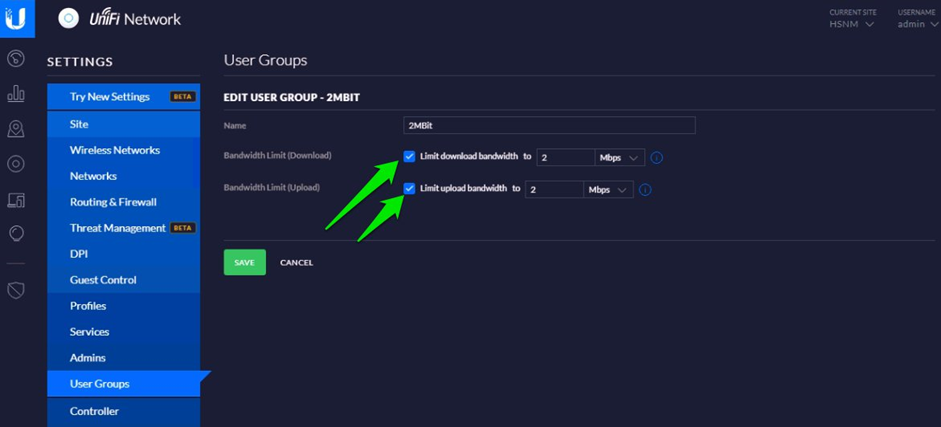
Now you have the ability to limit the bandwidth assigned to the guests, by creating a User Group.
On the left menu, scroll down to User Group and click Create New User Group.
Configure with Name, Bandwidth Limit (Download), Bandwidth Limit (Upload)
Upon completion of the above steps, click the Save button to finish.
It will take into account the speed you set up here and not the one of the Product Policy in your HSNM.
Now you need to apply the User Group to your network. On the left menu, scroll down to Wireless Networks and select your Wireless Network.
Expand the Advanced Options session and select the User Group you have just created.
From the context menu of the gateway, press Download Gateway Config Files to download the configuration zip file.
Once the zip file is unpacked, you will find the following files:
The files must be edited in the Ubiquiti Themes folder. The paths vary depending on the SO where the Ubiquiti Controller is installed:
You don’t need to edit the MAC address of the gateway in your HSNM.
In your firewall, configure the port forward to accept disconnection requests from your HSNM (the same as in the “Radius Authentication and Access Control” paragraph and prerequisites).
You need to create the rule must with the following characteristics:
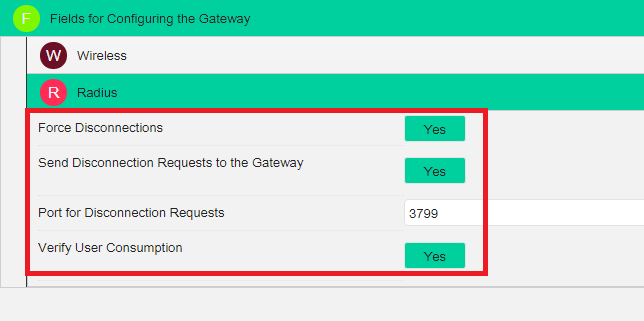
For Ubiquiti-type gateways, you need to enable these settings for the reasons listed below:
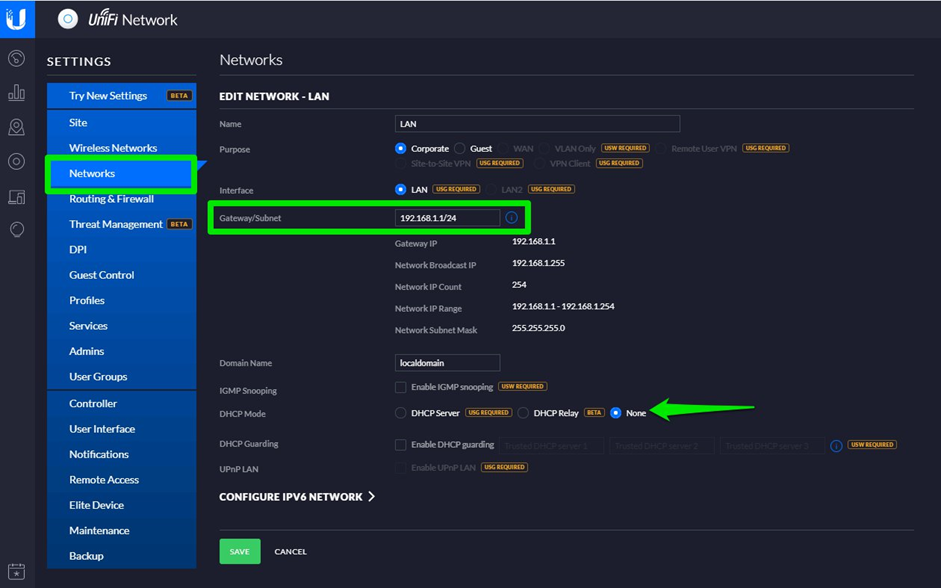
Go to the Settings menu, then scroll down to Networks and enter the IP address of your external gateway.
Disable the internal DHCP of your Unifi Controller by ticking None in the DHCP Mode field.
In case you need to configure the access over HTTPS, you need to follow the steps below:
Decide which FQDN to dedicate to the Unifi controller (in our test unifi.http://hsnm1.hsnetworkmanager.com.com)
Purchase a valid certificate (in our case wildcard certificate .http://hsnm1.hsnetworkmanager.com.com)
Make sure that you have the complete chain (cert, intermediate, root) of your own certificate because UNIFI controller requires it. If you already have the full chain, then skip to the HTTPS keystore section otherwise continue in this section.
Purchase a valid certificate (in our case wildcard certificate .HSNM.com)
If the full chain is not available, you can use the following online utility: https://tools.keycdn.com/ssl to trace the correct concatenation.
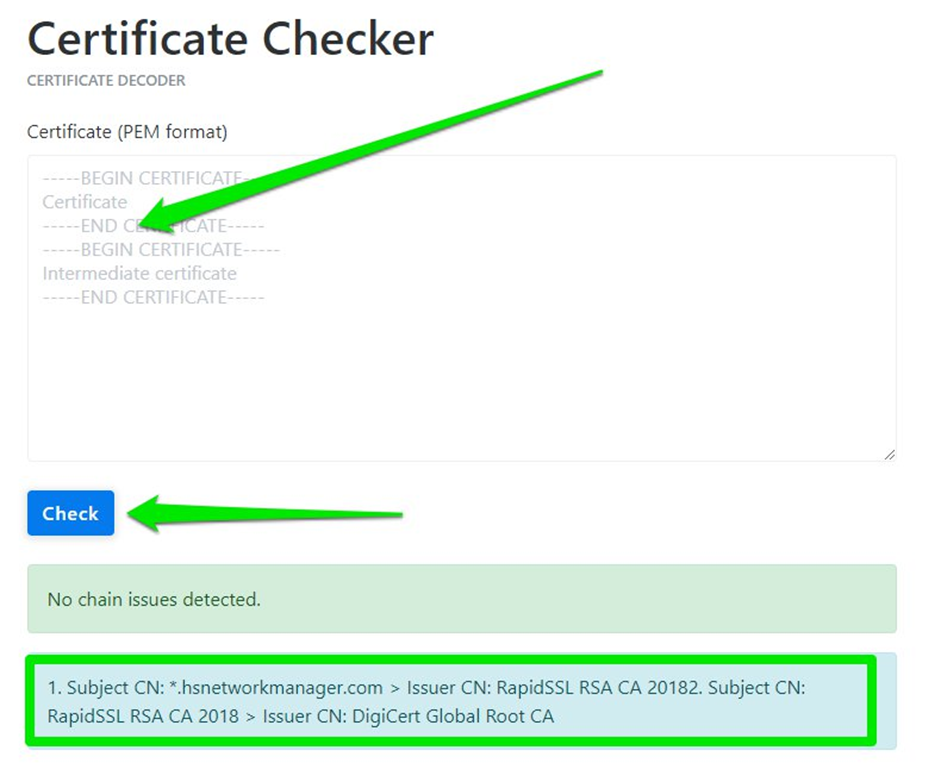
In our test we initially had the CRT and CA-intermediate and not the root. (You can deduct it that in the form we have pasted only 2 —–BEGIN CERTIFICATE—– —–END CERTIFICATE—–).
After a small search we went back to the missing root certificate (in the previous box identified by ISSUER CN):
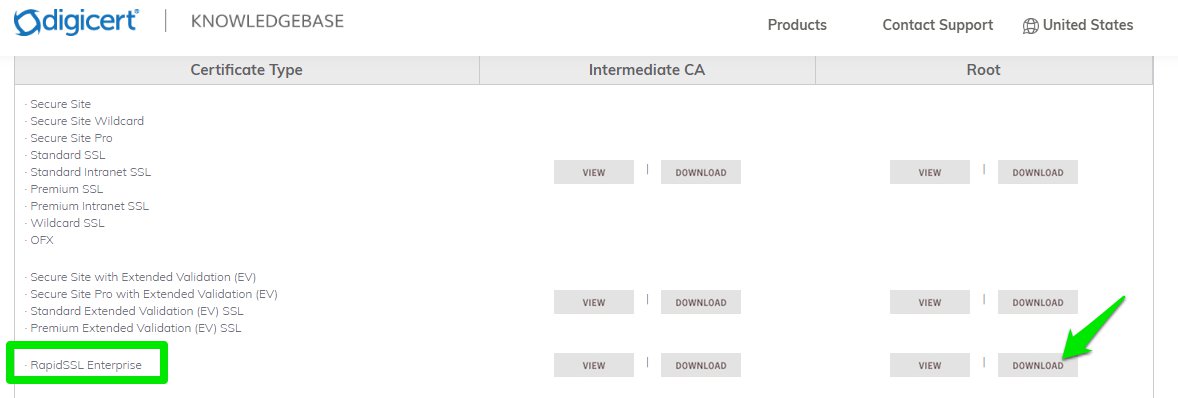
and the root cerfiticate in our case, is available at the issuer’s official website:
https://knowledge.digicert.com/generalinformation/INFO4033.html#links
Beware, this may vary depending on the issuer you choose for the certificate.
Once we have the entire chain available, repeat the verification on the site https://tools.keycdn.com/ssl to make sure that the complete chain is now correct.
(This time the —–BEGIN CERTIFICATE—– —–END CERTIFICATE—– should be 3)
We should be in this final situation:
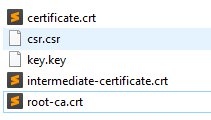
With a text or cli editor, we put certificate-intermediate-root into a single file, in the order in which we tested it in the online tool.
In our case we will name the final file as fullcert.crt
Install the following software https://keystore-explorer.org/downloads.html
Create a new JKS-type keystore
Click on Tools > Import Key Pair
Select the certificate format (in our case we used PKCS #8)
Select the key and the concatenated fullcert you created earlier
Uncheck Encrypted Private Key if you don’t have any type of passphrase set for the certificate, or type the Decryption Password of your certificate
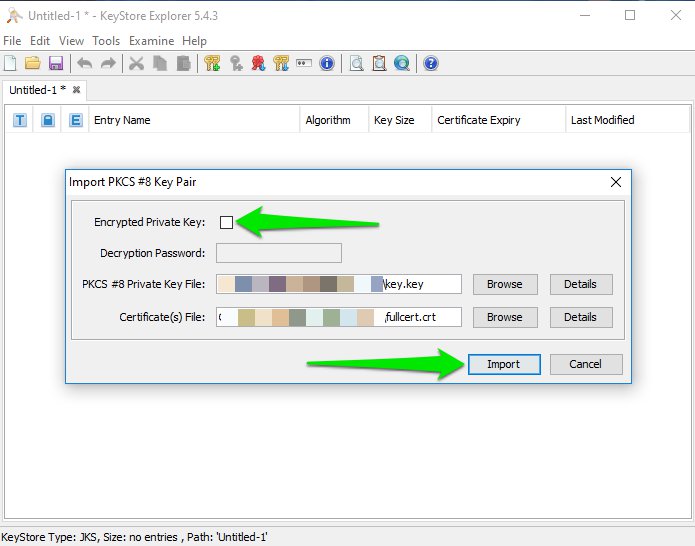
Click Import and choose Unifi as alias
Set as password aircontrolenterprise and as key pair and re-insert it for confirmation
Click on File > Save as
Set the keystore password aircontrolenterprise
Upload the new file created in the Unifi folder by replacing the existing “keystore” file.
The path of the file depends on the SO version where the UniFi controller is installed.
Restart ace.jar or the controller directly in case, for example, it is installed in a WINDOWS environment.
Configure in your gateway the static DNS route (prerequisites) of the FQDN chosen towards the LAN IP of your Unifi Controller (in our case unifi.http://hsnm1.hsnetworkmanager.com.com – 192.168.1.90)
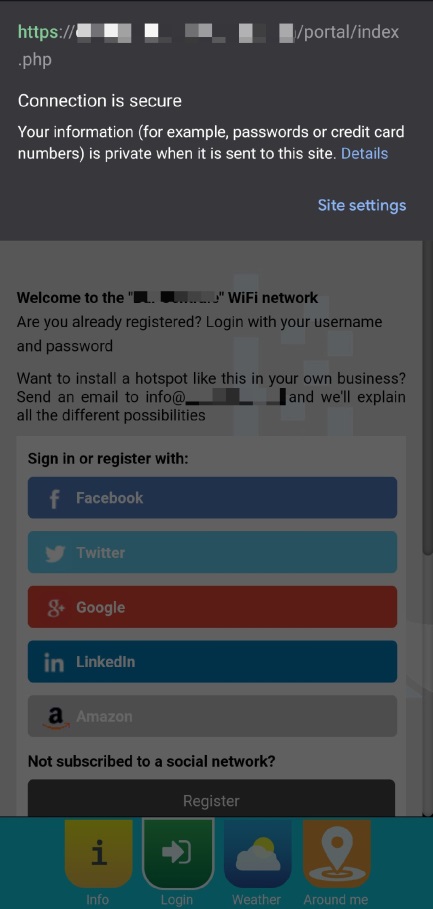
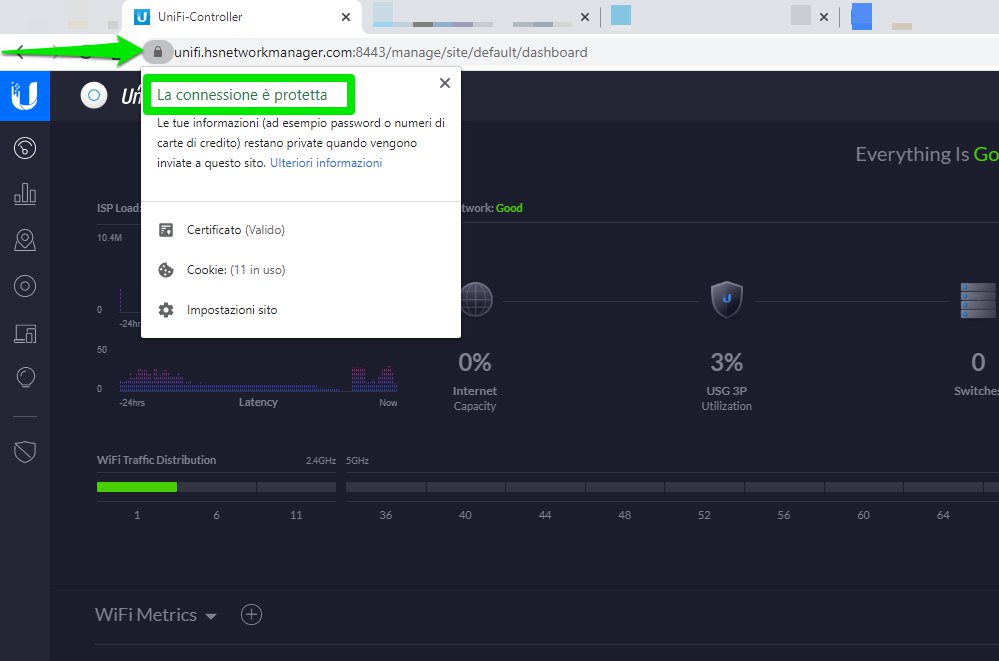
At this time, we can invoke the controller via browser (your gateway IP in a pc/mac in the same network with first DNS) with the newly configured FDQN. In case the installation of the certificate is successful, you will reach the portal in HTTPS.
If you do not get this point with the certificate correctly installed, you will need to check all the previous points described in the current “HTTPS Keystore” paragraph.
In this session, you can configure the ability to use the HTTPS protocol.
Go to the Settings menu, then scroll down to Guest Control.
Select the options as follows:
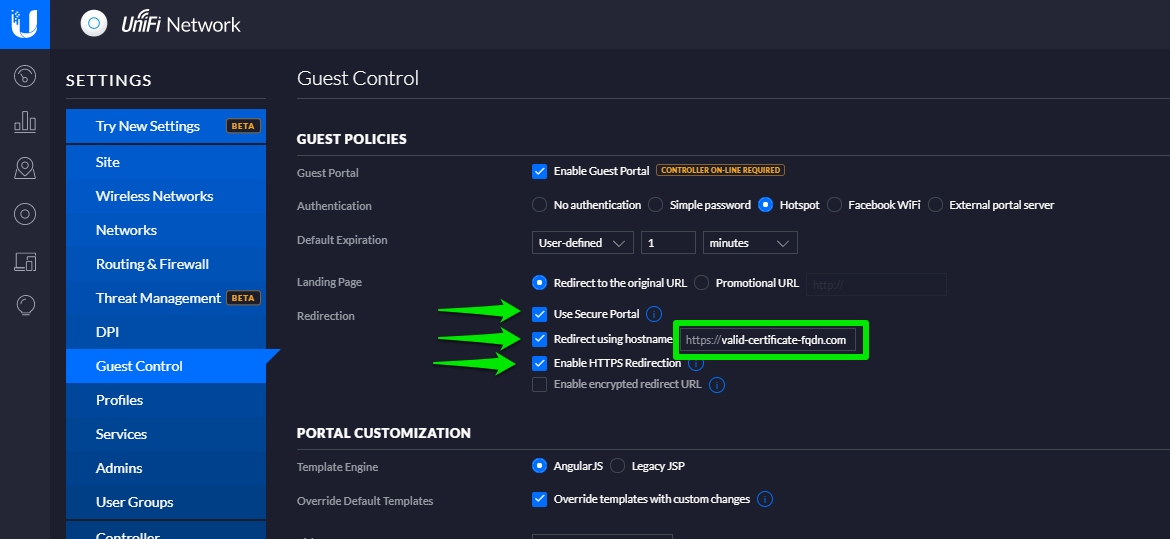
Click Save in the bottom left corner of the page. Your selected entries are saved.
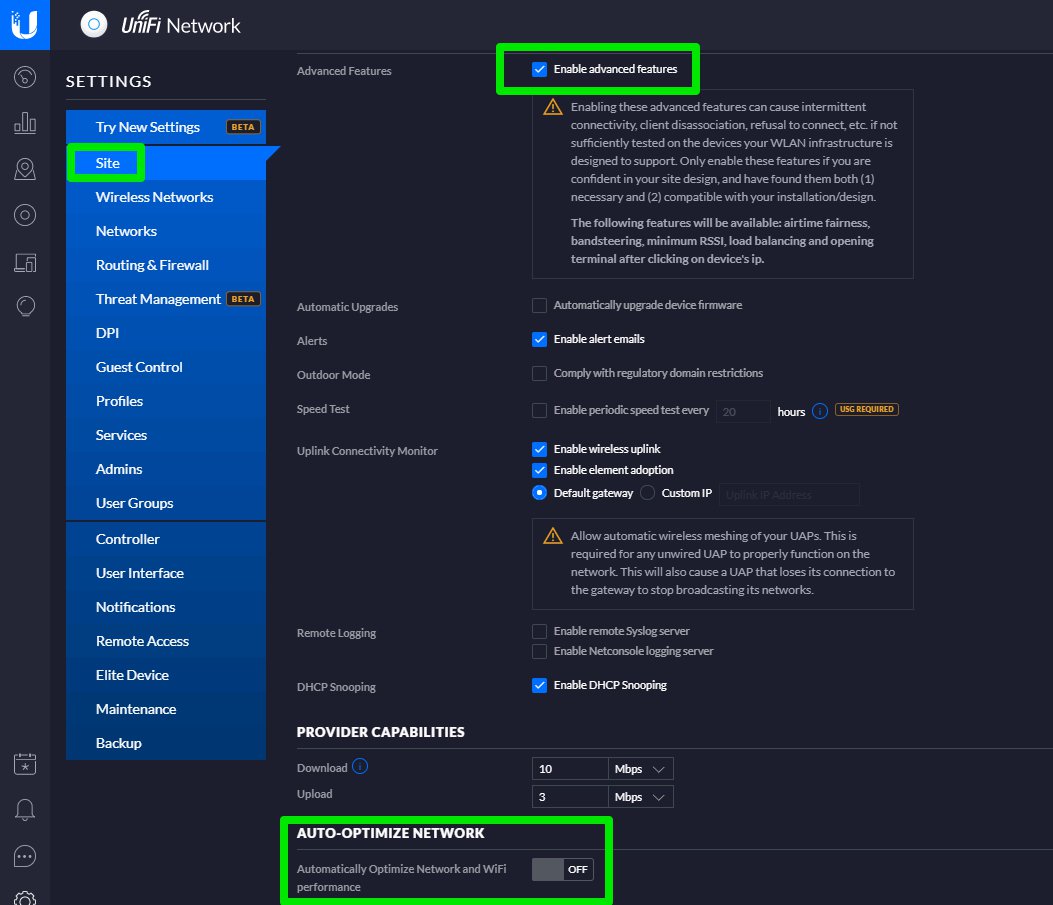
By default, Ubiquiti does not allow using a DNS outside the controller.
To allow using your gateway (where you have entered the DNS static route), you need to perform these steps:
Go to the Settings menu, then scroll down to Site
Tick Enable Advanced Features and disable Optimize Network.
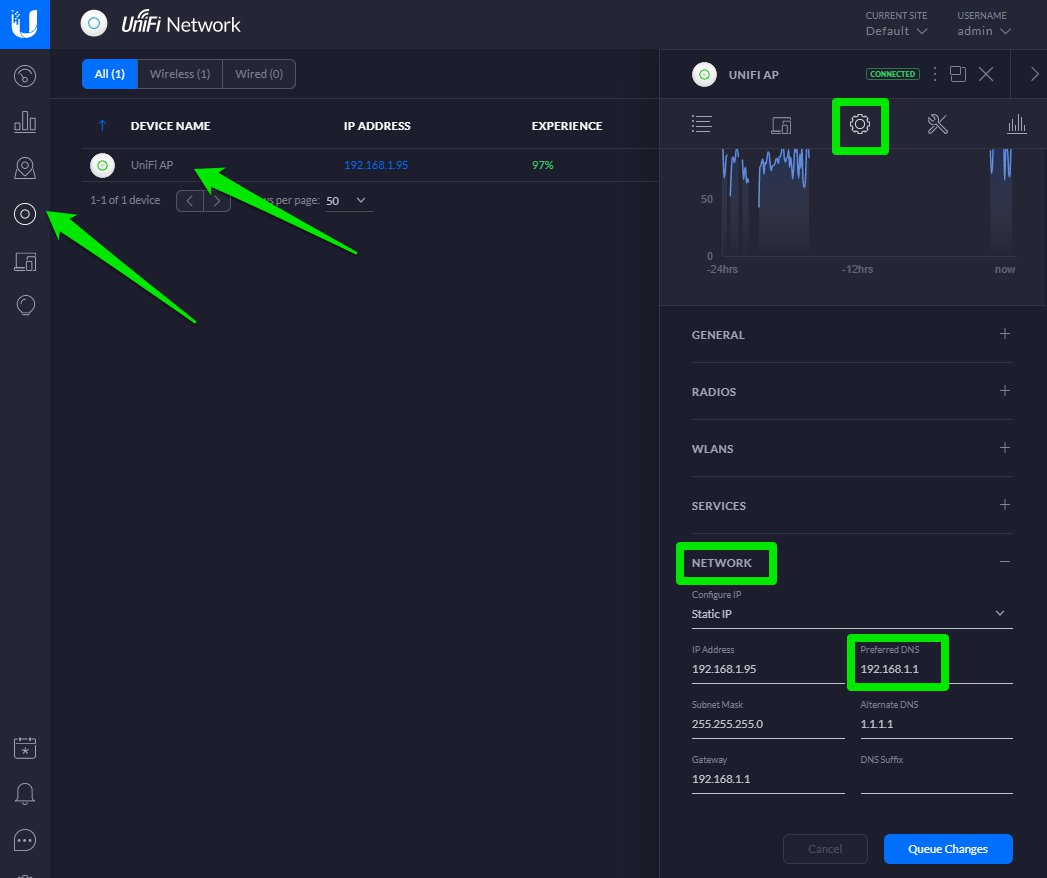
As primary DNS of the AP, you need to edit the IP of your gateway as the image that follows:
You can now redirect to the Welcome Portal with a secure HTTPS protocol.