
Administrator Manual
The gateways branch, in addition to the virtual gateways and printers, contains the “Map, Zones or Floors” where you can place the access points on a custom or geographic image.
By clicking the bar with the right mouse button or pressing the context properties button, you expand the context dropdown menu that contains a range of options grouped by: default; edit; admin
It contains the following options:
| Option | Description |
|
Display the map, zone or floor |
Allows you to access the map, zone or floor where you can define the access points, the routes and the places. |
Contains the following options:
| Option | Description |
| List of Access Points | Allows you to access the page listing the access points. |
To enter a zone or a floor, select the data tab, press the context properties button of the gateway to enter and select “ Add Zone or Floor”. While, to change the properties of a zone or floor, still in the data tab, press the context button on the “Zone or Floor” and choose “ Edit”. In both cases, you will be displayed the page that allows you to manage the following fields.
| Field | Description |
| ID | Record ID. Self-assigned identifier of the record. Auto-assigned Identifier of the record. It can be used to use the API or external integrations.
It is displayed when editing an existing data and not when adding a new record. |
| Crated on | Displays the date of creation of the zone or floor. |
| Title | Zone or floor title. |
| Field | Description |
| Type | Type of map. The possible options are:
|
| Image of the Area or Floor | In this field, you can upload your own map. We suggest to use the SVG format in order to have a better resolution even when zooming. Visible only if you choose “Custom Image” in the “Type”. |
| Width in Meters | Defines the width value in meters of the image including any edges. This value is used to correctly size the image. Improper values will not allow correct placement of the access points. Warning! Editing this value after entering access points will cause a repositioning of the same. Visible only if you choose “Custom Image” in the “Type”. |
| Intensity of Positioning Map | Defines the intensity of the map for positioning users.
It requires the use of Hound sensors available from end 2018. |
This panel allows you to access the properties that allow you to publish the app of the maps in the Welcome Portal.
| Field | Description |
|
Show an App |
Show a specific app for this map, zone or floor |
|
App Title |
Title of the app to display in the app bar. Visible only if you enabled “Show an App”. |
| Icon |
Icon displayed in the Welcome Portal for the app. Recommended size: 128 x 128 pixel. Recommended image format: SVG or PNG. Visible only if you enabled “Show an App”. |
| Default Place |
Default place automatically displayed when opening the app. Visible only if you enabled “Show an App”. |
| Display the Routes |
Display the routes in the app. |
| Display the Access Points |
Display the access points in the app. |
|
Enablel GPS |
It requires users to enable GPS on the device as to detect their position. Warning! GPS tracking does not work with HTTPand CNA. |
|
Enable Map Zoom |
Enable the zoom of the map. If disabled, users cannot zoom. |
| Field | Description |
| CSS |
Enter any notes of the access point. |
| FieDefault Placeld | Description |
| Notes | Enter any notes of the access point. |
After entering the map, zone or floor, hereinafter referred to simply as “map”, to access the page for adding the access points, routes and places, click the relevant branch on the left of the sidebar or expand the context dropdown menu and choose “ Display the map, zone or floor ”.
You will open a page that graphically displays the map with the following options at the top-right corner:
If you enable GPS in custom maps by using the appropriate parameter that can be defined when adding or editing the map, you need to define three georeferenced control points to allow the system to transform geographic coordinates into customized coordinates and then track users on the map.
It is important to define points that are distant from each other, for example at the ends of the map in order to increase the accuracy of the conversion, and enter the correct coordinates. Incorrect values or points that are too close will cause errors during user positioning.
To define the points, after creating the map, click it in the data treeview on the left or select “Display the map, zone or floor” from the context dropdown menu. In the map that opens, move the three reference points to the desired position, click on each point and enter the GPS coordinates.
When clicking on each reference point you will open a property page that will allow you to process the following data:
| Field | Description |
| Latitude |
GPS latitude of the control point. |
| Longitude |
GPS longitudeof the control point. |
This panel contains some information, read-only property, that allows you to check if the data of the map size and the GPS coordinates of the control points are correct.
| Field | Description |
|
GPS CP x Distance |
Distance calculated using the GPS coordinates entered between the current point and point x. |
|
RCP x Distance |
Relative distance calculated using internal coordinates between the current point and point x. Internal coordinates depend on where the points have been allocated and on the size of the map in meters. |
|
GPS CP y Distance |
Distance calculated using the GPS coordinates entered between the current point and point y. |
|
RCP y Distance |
Relative distance calculated using internal coordinates between the current point and point y. Internal coordinates depend on where the points have been allocated and on the size of the map in meters. |
If the entered data are correct, the distances between “GPS CP x” and “RPC x” and between “GPS CP y” e “RPC y” should match.
Important! Before adding the access points, places or routes, define correctly the size of the image and the coordinates of the control points. Subsequent modifications involve changes to the coordinate system that cause unwanted displacements to what you have entered.
By clicking this button, you will add a new access point that will be located at the center of the map. At this point you will be able to place the access point in the correct place on the map where it was installed by simply dragging it with the mouse.
If you single click the “marker”, it is possibile to open the context menu that allows you to manage the access point and therefore also to access the page where you can modify the settings of the same described below in the “ Access point” paragraph.
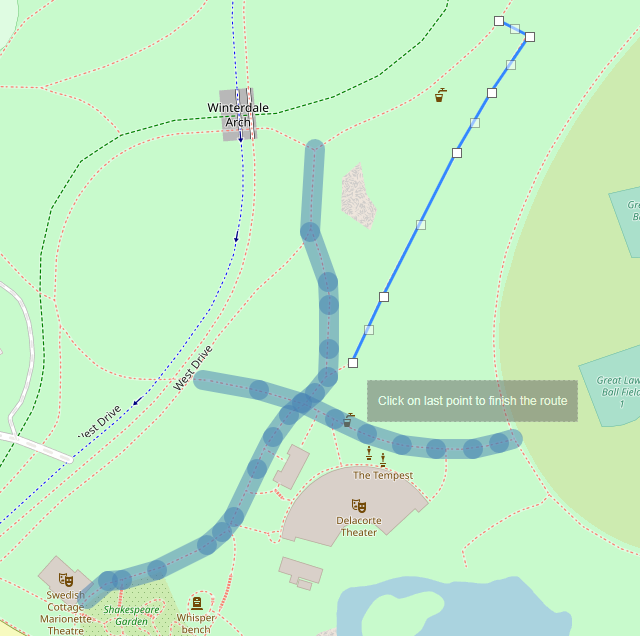
If you click this button, you activate the drawning mode of the routes that allows you to draw, by clicking on various points, the possible routes for guests. To start a route, click the first point on the map, continue clicking on other points of your choice and to finish, click on the last point again. Repeat the operation to draw all the desired routes.
The drawning of the routes is freehand and can also be completed in several stages. If you draw several routes and you need to use part of them to automatically calculate the shortest route to reach the places, you need to intersect the various routes.
Each point of the route is in fact a place that allows you to enter information for guests.
To edit or delete a route, click in the polyline of the route or in the point of the effected route. You will be displayed the route editing symbol. When clicked, it opens the context menu that allows you to delete the entire route or divide the segment in two. If you click on one of the two markers displayed at the ends of the segment, you can access the place properties page.
By clicking this button, you can add a place on the map. A place is a point that contains information for guests and is represented graphically on the map with a “Marker” with the desired features.
The same properties are also available for each node of a route. In practice, a “Node” can become a “Place” if you enter the properties.
To edit the features of a pre-entered place just click it with the mouse on the map.
The place allows you to process the following data:
| Field | Description |
| Title |
Place title. @ Multilingual field. |
| Searchable |
Define whether users can search for the place. |
| Selectable |
Define whether the place is selectable and has properties to display to users |
| Address |
Address of the place. Visible only if you activated “Selectable”. |
| Phone |
Telephone of the place. Visible only if you activated “Selectable”. |
|
Email of the place. Visible only if you activated “Selectable”. |
|
| Web Address |
Web address. Visible only if you activated “Selectable”. |
| Latitude |
Latitude in custom coordinates. Visible only if you are processing data from a custom map. |
| Longitude |
Longitude in custom coordinates.Visible only if you are processing data from a custom map. |
| Field | Description |
|
Show a Marker |
Show a marker always visible on the map. |
|
Zoom Level |
Define the zoom level of the map when selecting a marker. The possible values are:
|
|
Content Type |
Marker content type. The possible values are:
|
|
Style |
Marker style. The possible values are:
|
|
Border Color |
Marker border color. |
|
Color |
Marker color. |
|
Background Color |
Marker background color. |
By clicking the “Add Media” button, you can add any number of media that enrich the content provided to users through images, video and audio.
You can manage for each media the following fields:
|
Field |
Description |
|
Title |
Media tytle. Multilingual field. |
|
Type |
Media type. The possible values are:
|
|
Image, Video and Audio |
Allows you to upload and displaying the preview of the uploaded file based on the “Type”. |
Not visible if you have not activated the “Selectable” property in the “General Option”.
|
Field |
Description |
|
Description |
Extended description in HTML format associated with the place. Multilingual field. |
Not visible if you have not activated the “Selectable” property in the “General Option”.
|
Field |
Description |
|
Days of the Week |
Allows you to enter the morning and afternoon opening time for each day of the week. |
Not visible if you have not activated the “Selectable” property in the “General Option”.
By clicking the “Add Action” button, you can add you can add any number of actions that users can perform.
You can manage for each media the following fields:
|
Field |
Description |
|
Title |
Action title. Multilingual field. |
|
Type |
Action type. The possible values are:
|
|
Map, Zone or Floor |
Map, zone or floor to open. The list displays all the maps uploaded for the gateway. Visible only if you set “Open Map” in the “Type” field. |
|
URL |
URL to open. Visible only if you set “Open URL” in the “Type” field. |
|
Color |
Button color. |
|
Background Color |
Button background color. |
Not visible if you have not activated the “Selectable” property in the “General Option”.
By clicking the “Add Link” button, you can add any number of links to other places on other maps.
The links of a place with another map are used to link, for example, a floor to another floor and thus make sure that the system is able to find the direction if you do searches involving multiple maps.
The most complete example is to define the stairs to go up to the first floor with a “Marker” on the ground floor and add another “Marker” to define the stairs to go down to the ground floor with a “Marker” on the first floor and then “Link them” to each other. Once this is done, if users are on the ground floor and are looking for a place on the first floor, they will be shown the route to reach the stairs on the ground floor and then the route to the first floor.
You can manage for each media the following fields:
|
Field |
Description |
|
Map, Zone or Floor |
Map, zone or floor linked. The list displays all the maps uploaded for the gateway. |
|
Place |
Linked place of the map. The list contains all the places of the map chosen on “Map, Zone or Floor”. |
Visible only if you have enabled the “Selectable” property in the “General Option” and it it is a place along the route.
By clicking the “Add Tag” button you can add any number of keywords associated with the place.
They are used to add search “keys” that users can use to search for places and that extend the contents included in the title of the place, in the description and in the “Text contained in the marker”.
You can manage for each media the following fields:
|
Field |
Description |
|
Tag x |
For any Tag you add, you can edit a description.
|
Not visible if you have not activated the “Selectable” property in the “General Option”.
|
Field |
Description |
|
Custom CSS |
CSS that customise the graphic of the place. |
Not visible if you have not activated the “Selectable” property in the “General Option”.
Define additional HTML contents with JavaScript support that can be displayed by an “Action” described above.
|
Field |
Description |
|
Custom HTML |
HTML which defines extra contents. |
|
Custom CSS |
CSSs that customise the graphical of extra contents. |
|
Custom JavaScript |
JavaScript for the extra content. |
Not visible if you have not activated the “Selectable” property in the “General Option”.
The following buttons are displayed in the upper-righ corner of the command bar, in addition to the choice of the current language and the button to recharge the page:
|
Button |
Description |
|
Sequence of Places |
Allows you to define, dragging up and down with the mouse the various places, the sequence of places to visit. On the right of each place there is a check that if you deactivate excludes the place from the sequence of places to visit. |
|
Directions |
Allows you to access a page that allows you to simulate the search for directions. The search requires the starting and destination places. If there are multiple maps connected, the places of all maps involved will be listed. After having defined/searched the starting and destination places, the “View Route” button will appear, highlighting the road to travel on the map. In the ” Maps, Zones or Floors Involved in the Route” section, the maps that are involved will be listed and you can click them to switch from one map to another. |
The following buttons are displayed in the upper-righ corner of the command bar:
|
Button |
Description |
|
Previous Place |
Allows you to move to the previous place according to the defined sequence. You must define the sequence by pressing the appropriate “Sequence of Places” button in the “Command Bar” of the map. |
|
Next Place |
Allows you to moveto the next place according to the defined sequence. Use as a template for the place style = If you access the properties of a node, it automatically copies the contents of the current place. |
|
Context Menù |
Open the context menu for the place. The available options are:
|
|
Save |
Save the data of a place. |
|
Close |
Close the window for editing the properties of a place. |